


Instruction Manual
748214-V
June 2009
5-6 Routine Servicing Rosemount Analytical Inc. A Division of Emerson Process Management
Model 951C
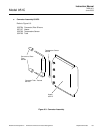
5. Orient the metal shield and black
plastic insulator as noted in step 2.
6. Carefully rotate and insert the tube,
shield and cover into the housing.
Orient as noted in step 1.
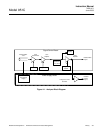
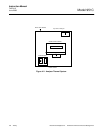
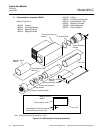
5-4 OZONE GENERATION SYSTEM
This system consists of the ultraviolet lamp,
lamp housing, and power supply. Refer to
Figure 6-1 for location and details of mount-
ing.
WARNING
TOXIC CHEMICAL HAZARD
The ozone generator lamp contains
mercury. Lamp breakage could result in
mercury exposure. Mercury is highly toxic
if absorbed through skin or ingested, or if
vapors are inhaled. Handle lamp assembly
with extreme care.
If lamp is broken, avoid skin contact and
inhalation in the area of the lamp or the
mercury spill. Immediately clean up and
dispose of the mercury spill and lamp
residue as follows:
•
Wearing rubber gloves and goggles,
collect all droplets of mercury by
means of a suction pump and aspirator
bottle with long capillary tube.
Alternatively, a commercially available
mercury spill clean-up kit, such as J. T.
Baker product No. 4439-01, is
recommended.
•
Carefully sweep any remaining
mercury and lamp debris into a dust
pan. Carefully transfer all mercury,
lamp residue and debris into a plastic
bottle which can be tightly capped.
Label and return to hazardous material
reclamation center.
Do not place in trash, incinerate or flush
down sewer. Cover any fine droplets of
mercury in non-accessible crevices with
calcium polysulfide and sulfur dust.
a. Lamp/Housing Removal
To remove the lamp and housing, do the
follow:
1. Disconnect power from the instru-
ment.
2. Release pressure from SAMPLE and
AIR supplies.
3. Disconnect the air supply tubing from
the front of the housing.
4. Disconnect the ozone tube leading to
the reaction chamber.
5. Disconnect the power cable from the
Power Supply.
6. Uncouple the two Velcro straps which
secure the housing to power supply.
7. Lift the housing from the analyzer.
b. UV Lamp Replacement
To replace the lamp, do the following:
1. Unscrew and remove end cap.
2. Unscrew aluminum outer lamp hous-
ing tube from lamp base, using care
not to hit or touch lamp assembly.
NOTE:
Do not touch lamp. Fingerprints may
cause a decrease in lamp output.
3. Replace O-ring in lamp base with new
O-ring supplied in kit.
4. Insert replacement lamp assembly us-
ing care not to hit or touch lamp hous-
ing.
5. Insert new O-ring into new end cap.
Screw end cap onto end of lamp
housing.
Replace the lamp and housing by revers-
ing the steps in this section.