


22
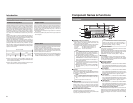
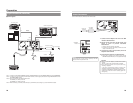
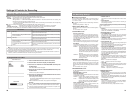
Signal Connections (continued)
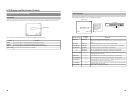
ⅥControl signals
VIDEO AUDIO
IN
IN
OUT
IN
OUT
CH1
CH2
REMOTE
USB
DV IN/OUT
SIGNAL
LAN
GND
DC 19V
4dB
8dB
INPUT
LEVEL
LINE
Y/C
OPEN/CLOSE
OPERATE
OPTION
DV LINEY/C
BUSY
SET UP
SET
TOP
MENU
RECPAUSE
PLAY FF
STOP
REW
PHONES
AUDIO
CH1
CH2
MENU
DV CAMCORDER GY-DV300
AUDIO
LEVEL
CH-1 CH-2
ND FILTER
ON
OFF
FOCUS
AUTO
PUSH
AUTO
MANU
OPEN
IRIS
VIDEO
LINE
IN
OUT
MONITOR
OUT
DC12V
DV
IN/OUT
IN OUT
OFF
AUDIO
REMOTE2
IN
B-YR-Y
SYNC IN
TIME CODE
IN OUT
Y
COMPONENT
OUT
CH 1/3 CH 2/4
IN
OUT
MONITOR
OUT
REMOTE1
TIMER
REC PLAY
SERIAL
REMOTE
SINGLE
GND
Y/C
Esc F1 F2 F3 F4 F5 F6 F7 F8 F9 F10 F11 F12
Print
Screen
Sysrq
Scroll
Lock
Pause
Break
Tab
Caps Lock
Shift Shift
Ctrl CtrlAlt
Alt
Enter
Back
Space
Insert
Delete End
Home
Page
Up
Page
Down
Enter
0
12
56
+
-
4
897
.
*
Num
Lock
1
Q
A
ZXCVBNM
<>
?
SDFGHJKL
U
WERTY IOP
234567890
-
^
@
;
:
/
,
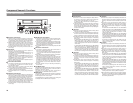
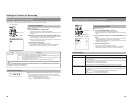
Note 1: In order to use the RS-422A REMOTE terminal, set REMOTE SELECT from the REMOTE MENU screen to 9PIN(MASTER).
Note 2: In order to carry out control using the DV IN/OUT terminal, make the appropriate selection using REMOTE SELECT from
the REMOTE MENU screen.
Note 3: One of the following DV cables should be used.
VC-VDV204 (2 m, 4P-4P) from JVC
VC-VDV206 (2 m, 4P-6P) from JVC
Note 4: When connecting a secondary device directly to your BD-X200, use a Category 5, cross-wired Ethernet cable.
Preparation
DV
camera or VCR
Nonlinear editing system
DV
Note 3
DV cable
Note 2
DV IN/OUT
Note 1
Remote cable
RS-422A compatible VCR
RS-422 REMOTE
REMOTE
LAN
USB
DC IN
AC adaptor (included)
Po
wer cord (included)
AC
Keyboard
Mouse
Category 5 cable
LAN
Receiver device
Note 4
23
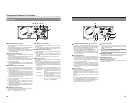
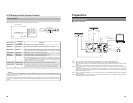
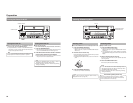
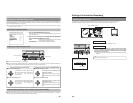
Power Connections
Connect the AC adaptor (included) to the DVD recorder.
VIDEO AUDIO
IN
IN
OUT
IN
OUT
CH1
CH2
REMOTE
USB
DV IN/OUT
SIGNAL
LAN
GND
DC 19V
4dB
8dB
INPUT
LEVEL
LINE
Y/C
Clamp
AC adaptor
(included)
Power cord
(included)
DC IN
AC
OPERATE
PHONES REV
AUDIO
CH1
CH2
OPERATE
indicator
1.
Connect the AC adaptor’s DC cord to the DVD
recorder’s DC IN terminal.
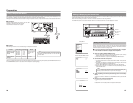
2.
Secure the DC cord using the DC power cord
clamp in order to prevent accidental
disconnection.
q Remove the screw and then the clamp.
w Insert the DC cord into the clamp, and then secure the
clamp to the DVD recorder.
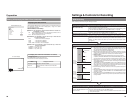
3.
Connect the power cord (included) to the AC
adaptor’s AC IN terminal.
4.
Insert the power cord into an electrical outlet.
● Power will be supplied to the DVD recorder and the
OPERATE indicator will be lit up in red. (Operate Off mode)
Note
A small amount of current will be required by the DVD
recorder when in Operate Off mode.
CAUTION
● Always use the AC adaptor provided with the DVD
recorder.
The use of other power sources should be avoided.
● Do not disconnect the DC cord or power cord during
recording or playback.
In the case of DVD-R discs, failure to observe this
precaution will result in the discs becoming unusable.
In the case of DVD-RW discs, it will be necessary to erase
all data from the disc and to start recording again from
the beginning.
Screw