


79
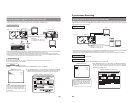
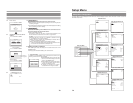
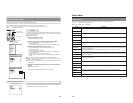
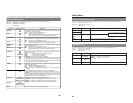
PRESET STYLE MENU screen
The following table identifies and describes the parameters that may be set using the PRESET STYLE MENU screen.
Top half : Appearance on monitor screen
Bottom half : Appearance on LCD display
[ ] : Default setting
Parameter Possible settings Description
STYLE [TYPE1]
TYPE2
TYPE3
TYPE4
TYPE5
TYPE6
TYPE7
TYPE8
STYLE [T1]
T2
T3
T4
T5
T6
T7
T8
TITLE PATTERN [1] to 6
TITL P [1] to 6
CHAPTER [1] to 6
PATTERN
CHAP P [1] to 6
MENU
This parameter is used to select one of the eight different display styles that have
been provided for title and chapter menus. (☞ Page 44)
This parameter is used to open the TITLE PATTERN screen.
That screen can then be used to select a display pattern for the title menu.
This parameter is used to open the CHAPTER PATTERN screen.
That screen can then be used to select a display pattern for the chapter menus.
This button is used to return to the Setup Menu screen.
E-80
Setup Menu
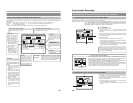
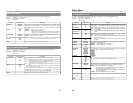
RECORDER MENU Screen
The following table identifies and describes the parameters that may be set using the RECORDER screen.
Top half : Appearance on monitor screen
Bottom half : Appearance on LCD display
[ ] : Default setting
RECORDER MENU (1/2) screen
Parameter Possible settings Description
CHAPTER [MANUAL]
CREATION AUTO
CHAPTR [MANU]
AUTO
SET INTERVAL Every01min
[Every05min]
Every59min
INTERV 1
[5]
59
TOTAL [NO USE]
CONTENTS TIME 0:01
9:59
CNTENS [000]
001
959
ENCODE [8.0]
QUALITY(Mbps) Setting range
described on right.
QUALITY [8.0]
AUDIO ENCODE LPCM
[DOLBY DIGITAL]
MPEG
A ENC LPCM
[DD]
MPEG
ASPECT [AUTO]
4:3
LETTER BOX
SQUEEZE
ASPECT [AUTO]
4 3
LETT
SQUE
†
MENU
This parameter is used to indicate whether or not chapters are to be created
automatically at set intervals while recording.
MANUAL : Chapters are not to be created automatically.
Use this setting when chapters are to be set manually.
AUTO : Chapters are to be created at set intervals during recording.
The SET INTERVAL parameter below is used to specify this interval.
This parameter becomes active whenever CHAPTER CREATION has been set to
AUTO.
It is used to set the time interval for automatic chapter creation and is set in units of
minutes.
If you already know the duration of the video to be recorded, this parameter can be
set to the corresponding time to allow your BD-X200 to select the optimum encoding
bit rate.
(Make a setting in hours and minutes between 00:00 and 9:59.)
● If the recording time is set using this parameter, ENCODE QUALITY will be set
automatically, and this setting may not be modified manually.
● If this function is not to be used, set it to NO USE.
When this setting is made, ENCODE QUALITY will be returned to its previous
setting.
This parameter can be set when TOTAL CONTENTS TIME has been set to NO USE.
Specifically, it allows direct setting of the encoding bit rate (i.e., the amount of data per second).
The actual setting range depends on the setting that has been made for AUDIO
ENCODE.
LPCM : 4.0 to 7.8 Mbps (in 0.2-Mbps steps)
DOLBY DIGITAL: 2.0 to 9.0 Mbps (in 0.2-Mbps steps)
MPEG : 2.0 to 9.0 Mbps (in 0.2-Mbps steps)
(E-model only)
This parameter is used to set the encoding format for audio data.
LPCM : Linear PCM encoding (Non-compressed)
DOLBY DIGITAL: Dolby AC3 encoding (Compressed)
MPEG : MPEG encoding (Compressed)
(E-model only)
The screen aspect distinction signal of recorded video is selected.
AUTO : Aspect distinction signal is recorded according to the screen aspect
ratio of the input video.
4:3 : Constantly records aspect distinction signal of 4:3 aspect ratio.
LETTER BOX : Constantly records aspect distinction signal of letterbox video.
(Content at the top and bottom of the screen is blackened out.)
SQUEEZE : Constantly records aspect distinction signal of squeezed video.
(Content at the left and right of the screen is compressed.)
Note
Setting this item to LETTER BOX or SQUEEZE will not change the output image
during recording and is reflected only in the recording to the disc.
This button is used to display the RECORDER MENU (2/2) screen.
This button is used to return to the Setup Menu screen.