


28
Setting & Displaying the Date & Time (continued)
Displaying the Date and Time
Use the DISPLAY MENU screen to indicate whether or not the date and time are
to be displayed on-screen and to set a display style. (੬ Page 74 for details
regarding setting methods.)
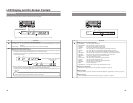
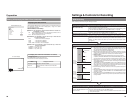
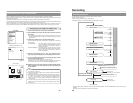
DISPLAY MENU Screen Makeup
Ⅵ DISPLAY: This parameter is used to indicate whether or not data is to
be displayed on-screen.
ON : Data will be displayed on-screen. The following parameters can be
used to indicate which data is to be displayed.
OFF : No data is displayed on-screen.
Ⅵ TIME/DATE: This parameter is used to set the way in which the date
and time are displayed.
OFF : Neither date or time are displayed.
TIME : Only the time is displayed.
DA
TE : Only the date is displayed.
TIME + DATE : Both date or time are displayed.
Ⅵ
DATE STYLE: This parameter is used to select the way in which the
date is to be displayed.
YY/MM/DD : Year, month, day
MM/DD/YY : Month, day, year
DD/MM/YY : Day, month, year
DISPLAY MENU screen
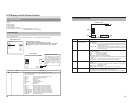
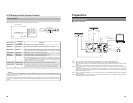
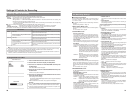
Preparation
To display date and time information on-screen;
●
Set DISPLAY to ON.
● Set TIME/DATE to anything other than OFF.
Date and time information is displayed as follows.
Mode Displayed information
Recording or Stop The value of the internal clock
Playback The date and time at which the current disc was
finalized.
MENU
DISPLAY
ON
TITLE/CHAPTER
ON
RECORDER MODE
TIME+DATE
ON
TIME/DATE
REMAIN
ON
DATE STYLE
MM/DD/YY
DISPLAY MENU
000 min
04/05/04
11:20:00
TITLE 1 0:11:22
CHAPTER
1 0:11:22
REC
On-screen display
TIME/DATE
(DD/MM/YY:
E-model)
29
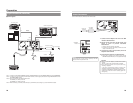
Settings & Controls for Recording
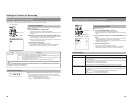
DVD Recording
DVD recording is carried out using the following procedure.
Pre-Recording Settings
Preparation of the DVD-R or DVD-
RW (video mode only).
On-screen settings
Adjustment of audio recording levels.
Selection of styles for the title and
chapter menus
● Insert a new DVD-R or DVD-RW (video mode), or alternatively, a similar disc that has
been recorded on using the DVD recorder.
● If the recording on a DVD-RW is to be performed once again from the beginning, erase
the disc’s data using ERASE from the DISC MENU screen. (☞ Page 30)
Use the setting screens to select the appropriate recording signal, setup the recording
conditions, and make other necessary settings. (☞ Page 31)
Audio recording levels can be adjusted in one of two different ways. (☞Page 35)
The title and chapter menus are used during playback of a disc to select the section of
the disc to be viewed. A total of five different display styles have been made available for
these menus, and these can be selected using the PRESET STYLE MENU screen. In
addition, the DVD recorder also allows you to freely modify these display styles.
(☞ Page 37)
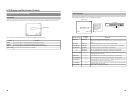
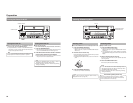
Recording Operations
(☞P
age 38)
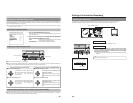
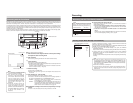
● The section between the start of recording using the REC and PLAY buttons
and the end of recording using the STOP button constitutes a single recording
title, and each title is assigned a unique number.
A single disc can contain up to 99 different titles.
●
Each title can be separated into a number of different chapters by inserting
chapter marks at the appropriate points. Unique numbers are also assigned
to chapters, and a single title can contain up to 99 different chapters.
● Adding chapters
A chapter mark is inserted automatically whenever recording is paused.
In addition, CHAPTER CREATION from the RECORDER MENU (1/2) screen
can also be used to setup the automatic or manual insertion of chapter marks.
● Thumbnails (i.e., the frame at the start of recording) and backgrounds are
automatically created for the title and chapter menus using the style selected
using PRESET STYLE.
If EDIT MENU from the SYSTEM MENU screen is set to ENABLE before the
start of recording, it will be possible to modify the chapter menu’s style and
thumbnails and to insert chapter names and comments whenever recording
is stopped (i.e., whenever title closing is performed).
● Once title closing has been carried out, it will not be possible to modify the
chapter menu.
● The REC CONTROL panel can be used to perform recording operations with
a keyboard and mouse. (REC CONTROL from the REMOTE MENU screen
must be set to ON.)
● If EDIT MENU from the SYSTEM MENU screen is set to ENABLE, it will be
possible to modify the title menu’s style and to input title names when the disc
is being finalized.
Title 1
Chapter 1
Chapter 2
Chapter 3
Chapter 4
Title 2
Chapter 1
Chapter 2
Title 3
(chapter mark)
Start of
recording
End of
recording
(Title closing)
Start of
recording
End of
recording
Start of
recording
End of
recording
(Title closing)
(Title closing)
Processing After Recording
(
☞ Page 42)
If additional recording is to be
performed:
Press the OPEN/CLOSE button and
remove the disc.
If the disc is to be played on this DVD recorder or on a different DVD player:
Finalize the disc.
To do this, select FINALIZE from the DISC MENU screen.
*
When a disc has been finalized, it will not be possible to record more content to it or to
modify its menu styles.