


43
End of recording
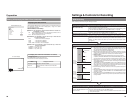
Title & Chapter Menu Settings
BD-X200 Title & Chapter Menus
This DVD recorder can automatically create title and chapter menus in response to recording operations and can save these to the
disc being recorded.
When the disc is subsequently played, these title and chapter menus can be used to access specific sections of stored video and
audio.
● When recording is stopped using the STOP button or a similar action (i.e., disc closing), a title number and a thumbnail
(corresponding to the frame at the start of recording) will be created to form part of the disc’s title menu. A single disc can contain
up to 99 different titles.
● Similarly, if a chapter mark is inserted during recording, a chapter number and a thumbnail (corresponding to the frame at the
chapter mark) will be created to form part of the title’s chapter menu. Chapter marks are used as targets for skipping during
playback. Each title can contain up to 99 chapters.
ⅥDisplay Styles
A total of eight different display styles can be used with title and chapter menus. The PRESET STYLE MENU screen can be used
to select the type of style to be used in the creation of title and chapter menus.
In addition, each of the display styles can be modified as required. (☞ Page 45)
Depending on the style used and the number of menu items, title and chapter menus may extend over more than one page.
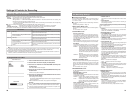
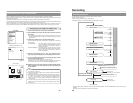
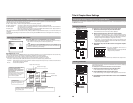
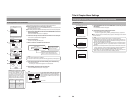
Title menu
Chapter menus
Start of recording
Title 1
End of recording
Start of recording
Title 2
Chapter mark Chapter mark Chapter mark
Thumbnail Thumbnail
Thumbnail Thumbnail Thumbnail Thumbnail Thumbnail
Chapter 1 Chapter 2 Chapter 3 Chapter 1 Chapter 2
Recording Recording
Notes
● This DVD recorder can store a total of six different display patterns for title and chapter menus.
At the time of purchase, your BD-X200 will contain five different template files. Any of the stored display patterns can be
selected to change the styles applied to each of the title and chapter menus.
● In addition, original title and chapter menus can also be created using Easy menu a freeware application for editing menu
templates. (☞ Page 46)
ⅥModifying Chapter Menus
A chapter menu’s display style and thumbnails can be edited at the end of recording (i.e., during title closing); furthermore, titles
and comments for the chapter menu can also be input at this time. (EDIT MENU from the SYSTEM MENU screen must be set to
ENABLE for this to be possible.)
(☞ Page 47)
ⅥModifying the Title Menu
The style used for the title menu and the text input for the title name may both be modified before finalizing is carried out.
(EDIT
MENU from the SYSTEM MENU screen must be set to ENABLE for this to be possible.)
(☞ Page 53)
Notes
● Thumbnail of the title menu will be the top thumbnail of the chapter menu.
●
Once a title is closed, it will no longer be possible to modify the chapter menu.
● No modifications whatsoever will be possible when the disc has been finalized.
●
When a disc is finalized, its title menu will be used to create the top menu.
● Thumbnail creation method during wide-signal recording can be selected in THUMBNAIL FORM of the RECORDER (2/2)
menu screen.
44
Title & Chapter Menu Settings
Selecting and Changing Styles for Title & Chapter Menus
Title and chapter menus are used during playback of a DVD to select a title or chapter for viewing. Your BD-X200 provides a total of
eight different styles for displaying title and chapter menus. Use the following procedure during the recording process to select
styles for these menus.
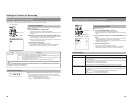
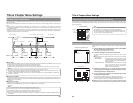
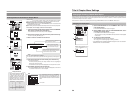
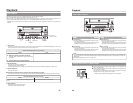
Typical Title Menu
Thumbnail
Background
Title
number
Notes
● This DVD recorder can store a total of eight display styles, where each style
is a combination of title and chapter menu display characteristics.
● The title menu can be displayed by pressing the TOP MENU button on the
front panel while in Stop or Playback mode; furthermore, the chapter menu
can then be opened using the MENU button.
Confirming or Selecting a Style
Display styles can be selected and modified using the PRESET STYLE MENU
screen.
1.
Press the SET UP button to display the Setup Menu, select PRESET
STYLE, and then press the SET button.
● The PRESET STYLE MENU screen will appear.
2.
Confirm the settings for the currently selected style.
The STYLE parameter will display the type number of the style currently
selected.
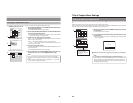
ⅥSelect STYLE and then press the SET button to display the corresponding
STYLE screen.
TITLE PATTERN : The display pattern currently selected for the title
menu. Each display pattern uses different numbers,
positions, and sizes for thumbnails, in addition to a
different background.
CHAPTER PATTERN : The display pattern currently selected for chapter
menus. Each display pattern uses different
numbers, positions, and sizes for thumbnails, in
addition to a different background.
3.
Use the cursor buttons (
6, 7, t, and 8) to select one of the
eight style types and to display the corresponding STYLE screen,
containing both title and chapter patterns.
4.
To use a specific style, select the corresponding type number
and then press the SET button.
This type number will then be stored in the DVD recorder’s memory.
Following this, the screen’s BACK button will be highlighted. The SET button
can now be pressed to return to the PRESET STYLE MENU screen.
ⅥIf BACK is used to exit the STYLE screen without the SET button being
pressed for the newly selected type, the style setting will not be updated.
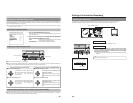
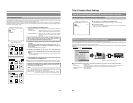
MENU
STYLE
TYPE1
1
1
TITLE PATTERN
CHAPTER PATTERN
PRESET STYLE MENU
Type number
STYLE screen
PRESET STYLE MENU screen
Style types