


41
Using a Keyboard & Mouse to Control Recording
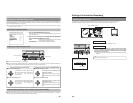
BD-X200 recording operations can be carried out using the REC CONTROL panel displayed on the monitor. In addition, a keyboard
and mouse can also be used when working with this panel.
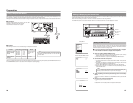
Signal Connections
Connect a keyboard and mouse to the USB terminals on the back of the DVD
recorder.
Settings
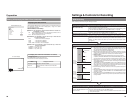
●
If the REC CONTROL panel is to be displayed on-screen, set REC CONTROL
from the REMOTE MENU screen to ON.
This panel will be displayed in Stop, Recording, and Recording Pause mode.
ⅥTo open the Setup Menu, press the DVD recorder’s SET UP button. It is not
possible to open this screen using the keyboard or mouse.
Procedure
1.
Start recording.
Keyboard : Use the arrow keys (©
, †, ∞, and √) to select Record (r)
from the REC CONTROL panel, and then press the Enter key.
Mouse : Move the mouse pointer to the Record (r) button and left click
while the Record button selected.
2.
Pause recording.
Keyboard : Use the arrow keys (©,†,∞, and
√) to select Pause (
w
) from
the REC CONTROL panel, and then press the Enter key.
Mouse : Move the mouse pointer to the Pause (
w) button and left click
while the Pause button is selected.
● The DVD recorder will adopt Recording Pause mode; in addition, a chapter
mark and thumbnail will be inserted at the current position.
3.
Restart recording.
Keyboard : Use the arrow keys (©, †, ∞, and
√) to select either Record
(r) or Pause (w) from the REC CONTROL panel, and then
press the Enter key.
Mouse : Move the mouse pointer to the Record (r) or Pause (w
) button
and left click while the Record or Pause button is selected.
ⅥSteps 2 and 3 can be repeated to create a single, partitioned title.
4.
End recording (i.e., close the title)
Select Stop (q) from the REC CONTROL panel and press the Enter key.
● The action of the DVD recorder following the end of recording depends on
the setting of EDIT MENU from the SYSTEM MENU screen.
DISABLE : Recording is ended and the chapter menu is created using
standard settings (i.e., the title is closed).
ENABLE : The THUMBNAIL EDIT screen will appear. This screen can
be used to modify the chapter menu’s display style, to change
the thumbnails used, to input chapter names, and to perform
other similar functions. For more details, refer to page 47.
ⅥIf additional recording is to be carried out, repeat steps 1 through 4
above.
●
In such a case, each subsequent recording will be stored as a new title.
5.
End recording and remove the disc.
Depending on how the disc will be used, one of two different procedures
is implemented at this time.
● If more content will be recorded to the disc using this DVD recorder:
Simply press the DVD recorder’s OPEN/CLOSE button and remove the
disc. (Do not finalize the disc before it is removed.)
● If the disc is to be played on this DVD recorder or on a different DVD
player:
Use FINALIZE from the REC CONTROL panel to finalize the disc before it
is ejected.
F
or more details regarding finalizing, refer to page 42.
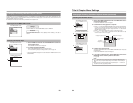
Esc F1 F2 F3 F4 F5 F6 F7 F8 F9 F10 F11F12
Print
Screen
Sysrq
Scroll
Lock
Pause
Break
Tab
Caps Lock
Shift Shift
Ctrl CtrlAlt
Alt
Enter
Back
Space
Insert
DeleteEnd
Home
Page
Up
Page
Down
Enter
0
12
56
+
-
4
897
.
/
*
Num
Lock
1
Q
A
ZXCVBNM
<>
?
SDFGHJKL
U
WERTY IOP
234567890
-
^
@
;
:
/
.
/
,
VIDEO AUDIO
IN
IN
OUT
IN
OUT
CH1
CH2
REMOTE
USB
DV IN/OUT
SIGNAL
LAN
GND
DC 19V
4dB
8dB
INPUT
LEVEL
LINE
Y/C
MENU
REMOTE SELECT
REM FF/REW MODE
9PIN(MASTER)
FF/REW
ON
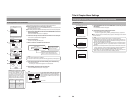
REC CONTROL
REMOTE MENU
000 min
04/05/04
11:20:00
TITLE 1 0:11:22
CHAPTER
1 0:11:22
REC
REMOTE MENU screen
REC CONTROL panel
Notes
● DISC TITLE from the REC CONTROL
panel can be selected to allow a name
to be input for the disc. This type of
name proves useful when managing
discs using a PC. Note that disc names
are not displayed on the monitor or the
DVD recorder.
Characters allowed for the disc title are
alphanumerical characters and
underscore (_) only. Space and other
symbols may not be used.
● FINALIZE and DISC TITLE from the
REC CONTROL panel cannot be used
while recording.
● The Record (r) button from the REC
CONTROL panel can be activated or
clicked to insert chapter marks and
thumbnails during recording.
42
Recording
Finalizing (for playback on this and other DVD players)
Finalize a disc recorded using this DVD recorder as described below in order to ensure that it can be played on this and other DVD
players. In the case of DVD-RWs, playback will be possible on DVD players that support video mode.
After finalizing a disc;
● No additional recording will be possible.
● The title menu cannot be changed.
● The titles created before finalizing will be displayed as the top menu.
Finalizing
The process of finalizing can be carried out in two different ways.
● Select DISC MENU and then FINALIZE from the Setup Menu.
● Select FINALIZE on the REC CONTROL panel when this is being used for recording.
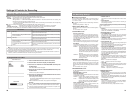
Setup Procedure: Insert the disc to be finalized.
1.
If using the Setup Menu:
1.
If using the REC CONTROL panel:
MENU
FINALIZE
EXECUTE
CANCEL
DISC ERASE
DISC MENU
000 min
04/05/04
11:20:00
TITLE 1 0:11:22
CHAPTER
1 0:11:22
REC
qPress the SET UP button to
display the Setup Menu, and
then select DISC MENU.
wSet FINALIZE from the DISC
MENU screen to EXECUTE
and then press the SET button.
Select FINALIZE and then press
the keyboard’s Enter key.
* If operating using a mouse, left
click the FINALIZE button.
FINALIZE button
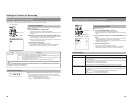
The screen that will now be displayed depends on the setting of EDIT MENU from the SYSTEM MENU screen.
If this is set to DISABLE, a screen seeking confirmation of
finalizing will appear.
In this case, perform finalizing as described below.
If this is set to ENABLE, a screen for editing title menus will
appear. Use this screen to confirm that the title menu is as
required, to modify the display style, and to input title
names. (☞
Page 53)
YES
NO
Confirmation screen
qSelect YES and then press the SET button to continue finalizing.
● The finalizing process will begin.
A bar showing the state of progress will be displayed during finalizing.
●
The progress bar will disappear when finalization has been completed and
the normal screen display will then be restored.
(The REC CONTROL panel will not be displayed.)
Ⅵ Select NO from the confirmation screen to cancel finalizing and return to the
previous screen.
2.
Make the appropriate selection in the confirmation screen.
FINALIZE
FINALIZE
Progress screen
Notes
● A maximum of 20 minutes will be required to complete finalizing.
● When finalizing is carried out, all of the disc’srecorded video and audio are
stored in accordance with the DVD Video Standard; accordingly, this content
can also be replayed as DVD video.
● Although a disc finalized using this DVD recorder may in principle be played
on other DVD players, there is no guarantee that all of its content will be
playable.
● The action to be taken by this DVD recorder when a finalized disc is inserted
or when playback of a title has ended is specified by DISC IN ACTION and
TITLE END respectively from the RECORDER MENU (2/2) screen.
TITLE END is to be set before recording a title.
DISC IN ACTION is to be set before finalizing.