


75
Setting the Setup Menu
Settings made in the setup menus are stored in the BD-X200’sinternal memory and will be retained even when the power is turned
off. It is also possible to return to default settings whenever so required.
In addition to the buttons on the front panel, a keyboard and mouse can also be used to perform operations on these menus. The
following section, however, will describe operations performed using the front panel buttons.
Keyboard : Select using the arrow keys (∞ and √), and confirm the selection using the Enter key.
Mouse : Left click the required item.
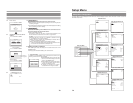
Setup menu operations are carried out while monitoring the display on the monitor
connected to the VIDEO LINE OUT terminal. In addition, setup menu content also
appears on the LCD display.
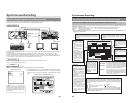
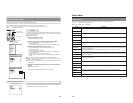
Ⅵ Stop the DVD recorder.
1.
Open the Setup Menu screen.
To do this, press the SET UP button
2.
Open the setup menu in which settings are to be modified.
q
Use the 6and 7 buttons to select the required screen.
w Press the SET button
* The EXIT option can be selected to return to the normal screen display.
3.
Make the required settings in the setup menu.
q
Use the 6 and 7 buttons to select the parameter to be set.
w Press the SET button
● A list of setting values will appear.
e Use the 6
and7buttons to select the required value from the list and then
press the SET button.
● The setting value will be modified accordingly.
r
Repeat steps
q through
e until all of the required settings have been
made.
Ⅵ
To return to the Setup Menu, select MENU and press the SET button.
Ⅵ To move to the next menu screen, select the †button at the top of the current
screen and press the SET button.
Ⅵ To return to the original menu screen, select either MENU or BACK and press
the SET button.
4.
Use either of the following methods to return to the normal screen
display.
Press the SET UP button.
or
Select EXIT from the Setup Menu and press the SET button.
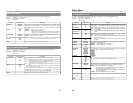
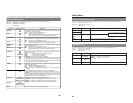
Settings
MENU
TEST SIGNAL
OFF
FACTORY SETTING
EXECUTE
KEYBOARD STYLE
ENGLISH
EDIT MENU
ENABLE
TOTAL RECORDING TIME
5 Hour 30 Min
SYSTEM MENU
Restoring to Default Settings
All settings from the various setup menus can be returned to the corresponding
default settings by setting FACTORY SETTING from the SYSTEM MENU screen
to EXECUTE and by then pressing the SET button.
BUSY
OPEN/CLOSE
TOP
MENU MENU
OPTION DV Y/CLINE
SET UP
SET
EXIT
DISC MENU
INPUT SELECT
SYSTEM
PRESET STYLE
RECORDER
REMOTE
DISPLAY
CLOCK ADJUST
DUBBING
NETWORK
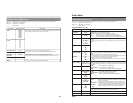
MENU
CHAPTER CREATION
MANUAL
SET INTERVAL
Every05Min
TOTAL CONTENTS TIME
NO USE
ENCODE QUALITY (Mbps)
4.4
AUDIO ENCODE
LPCM
ASPECT
AUTO
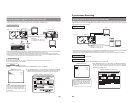
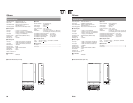
RECORDER MENU (1/2)
MENU
CHAPTER CREATION
SET INTERVAL
TOTAL CONTENTS TIME
ENCODE QUALITY (Mbps)
AUDIO ENCODE
LPCM
4.4
RECORDER MENU (1/2)
MANUAL
AUTO
SET button
Cursor buttons
(6, 7
, 8 and t)
SET UP button
Setup Menu
RECORDER MENU (1/2) screen
Setting list
SYSTEM MENU screen
76
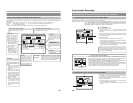
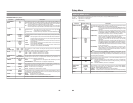
Setup Menu
Setup Menus
The following table identifies and describes the parameters that may be set using the Setup Menus.
Top half : Appearance on monitor screen
Bottom half : Appearance on LCD display
Option Description
DISC MENU
DISC MENU
INPUT SELECT
INPUT SEL
SYSTEM
SYSTEM
PRESET STYLE
PRESET
RECORDER
RECORDER
REMOTE
REMOTE
DISPLAY
DISPLAY
CLOCK ADJUST
CLOCK
DUBBING
DUB
NETWORK
NETWORK
EXIT
This button opens a menu that allows settings to be made for finalizing and other similar disc processes.
This button opens a menu that allows input audio and video signals to be selected.
This button opens a menu that allows settings to be made for the DVD recorder itself.
This button opens a menu that allows settings to be made for title-menu and chapter-menu display styles.
This buttons opens a RECORDER MENU screen containing two different pages of parameters.
The RECORDER MENU (1/2) screen allows settings to be made for the chapter creation method and the
encoding of audio and video.
The RECORDER MENU (2/2) screen allows the settings required for recording to be made.
This button opens a menu that allows settings to be made for remote operations via the DVD recorder
’s
RS-422A or DV terminal. In addition, this menu also allows indication of whether or not the REC CONTROL
panel is to be displayed.
This button opens a menu that allows settings to be made for the display of status and alarm information
on the TV or monitor screen.
This button opens a menu that allows setting of the internal clock’s date and time.
This button opens a menu that allows settings to be made for DVD dubbing.
This button opens a menu that allows network settings to be made for LAN terminal usage.
This button is selected to return to the normal screen display.