


26
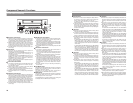
Preparation
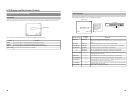
Using a Keyboard & Mouse
Menu settings, the title and chapter settings, and other DVD recorder settings are carried out from setting screens displayed on the
TV or monitor. In addition, recording operations can also be carried out from similar screens.
Although the DVD recorder’s b
uttons are used in setting and operation screens, a keyboard and mouse can be used as an alternative.
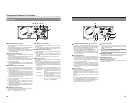
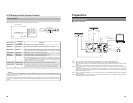
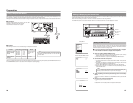
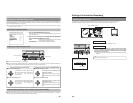
ⅥConnections
Connect a USB keyboard and mouse to the two USB
terminals on the back of the DVD recorder.
Recommended manufacturers: Logitech
Esc F1 F2 F3 F4 F5 F6 F7 F8 F9 F10 F11 F12
Print
Screen
Sysrq
Scroll
Lock
Pause
Break
Tab
Caps Lock
Shift Shift
Ctrl CtrlAlt
Alt
Enter
Back
Space
Insert
Delete End
Home
Page
Up
Page
Down
Enter
0
12
56
+
-
4
897
.
/
*
Num
Lock
1
Q
A
ZXCVBNM
<>
?
SDFGHJKL
U
WERTY IOP
234567890
-
^
@
;
:
/
.
/
,
VIDEO AUDIO
IN
IN
OUT
IN
OUT
CH1
CH2
REMOTE
USB
DV IN/OUT
SIGNAL
LAN
GND
DC 19V
4dB
8dB
INPUT
LEVEL
LINE
Y/C
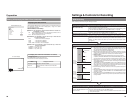
ⅥProcedure
The following functions can be controlled using the keyboard and mouse.
USB terminals
The entry of names and comments for the title and chapter menus is carried out using the keyboard. (Set KEYBOARD STYLE from
the SYSTEM MENU screen in accordance with the keyboard’s input language.)
Note
Unless otherwise specified, this user’s manual
describes procedures carried out from the DVD
recorder itself.
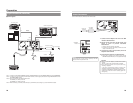
Function Front panel Keyboard Mouse
Selection of menu t button † key Move the mouse.
items or setting 8 button © key And then left
values 6
button
∞ key click.
7 button √key
Confirmation of
SET button Enter key Left click.
settings
27
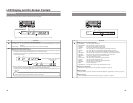
Setting & Displaying the Date & Time
Use the following procedure to set the internal clock
’s date and time. Even when the DVD recorder’spower is turned off, the clock’s
date and time settings are stored using the internal battery.
Note that these settings are used to write the current date and time to a disc being finalized.
The DISPLAY screen can be used to indicate whether or not the date and time are to be displayed on-screen.
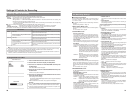
OPERATE
PHONES REV
STOP PLAY
DVDRECORDER
BD-X200
FWD PAUSE REC
BUSY
OPEN/CLOSE
TOP
MENU MENU
OPTION DV Y/C LINE
SET UP
AUDIO
CH1
CH2
TITLE
DOLBY DIGITAL
LPCM MPEG
CHAPTER
SET
6 button
SET UP button
t button
SET button
7 button8 button
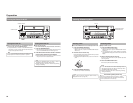
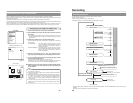
Setting the Date and Time
Setting of the date and time is carried out using the CLOCK ADJUST MENU
screen. During this procedure, the monitor connected to the VIDEO LINE OUT
terminal is used to monitor the setting of data.
ⅥTurn on the power and ensure that the DVD recorder is stopped.
1.
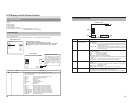
Press the SET UP button to display the Setup Menu.
2.
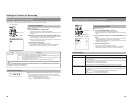
Open the CLOCK ADJUST MENU screen.
q Use the 6 and
7 buttons to select CLOCK ADJUST. (The currently
selected menu item is displayed as highlighted.)
w Press the SET button to open the CLOCK ADJUST MENU screen.
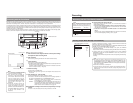
3.
Set the date and time as required.
q Use the 6and7
buttons to select either DATE or TIME. Then press the
SET button.
w Use the
tand8buttons to select the digit to be changed. (The currently
selected digit is displayed as highlighted text.)
e Use the
6 and 7 buttons to change the value of the selected digit.
r Repeat steps wthrough
eto make all of the required settings, and then
press the SET button.
4.
After completing all of the required settings, return to the Setup
Menu.
To do this, use the 6or 7buttons to select MENU and then press the SET
button.
5.
Return to the normal screen display.
●
To do this, press the SET UP button
or
● Select EXIT from the Setup Menu and press the SET button.
EXIT
DISC MENU
INPUT SELECT
SYSTEM
PRESET STYLE
RECORDER
REMOTE
DISPLAY
CLOCK ADJUST
DUBBING
NETWORK
MENU
DATE
04/05/04
10:00
TIME
CLOCK ADJUST MENU
MENU
DATE
04/05/04
12:00
TIME
CLOCK ADJUST MENU
Setup Menu
CLOCK ADJUST MENU screen
Note
It is not possible to set the time in units of seconds. After setting the
minutes, press the SET button in sync with a time signal.
CLOCK SETTING
07 44
07 :
44
SET