


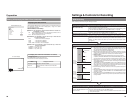


35
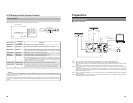
Adjusting of Audio Recording Levels
This DVD recorder’s audio recording levels can be adjusted using two different methods, and AUDIO REC VOLUME MODE from
the RECORDER MENU (2/2) screen indicates the method to be used. In addition, it is also possible to return the audio recording
levels to their default settings (i.e., unity gain).
Note:
The AUDIO INPUT LEVEL switch on the DVD recorder’s rear panel can be used to select the reference input level for analog
audio (i.e., +4 dB or –8 dB).
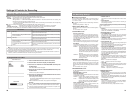
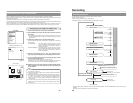
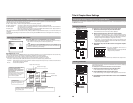
Selecting the Adjustment Method
1.
Open the RECORDER MENU (2/2) screen.
To do this, select †button from the RECORDER MENU (1/2) screen and
press the SET button.
2.
Make the required setting using AUDIO REC VOLUME MODE
from the RECORDER MENU (2/2) screen.
BOTH :Audio levels are adjusted while both the CH1/CH2
are maintained at the same volume.
INDEPENDENCE : The CH1/CH2 are adjusted separately.
BACK
Y/C TERMINAL MODE
S1
THUMBNAIL FORM
NORMAL
AUDIO CHANNEL (DV)
1,2ch † 1,2ch
AUDIO REC VOLUME MODE
BOTH
DISC IN ACTION
MENU
TITLE END
MENU
RECORDER MENU (2/2)
RECORDER MENU (2/2) screen
Adjusting the Audio Recording Levels
OPERATE
PHONES REV
STOP PLAY
DVDRECORDER
BD-X200
FWD PAUSE REC
BUSY
OPEN/CLOSE
TOP
MENU MENU
OPTIONDV Y/CLINE
SET UP
AUDIO
CH1
CH2
TITLE
DOLBY DIGITAL
LPCMMPEG
CHAPTER
SET
ⅥReturn from setting screens to the normal display.
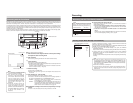
ⅥRecording levels can be adjusted in either Stop or Recording mode. Be sure to monitor the front panel’s audio level indicator as
the levels are being adjusted. Adjust the level so that the LED on the far right does not light.
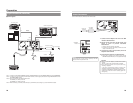
Buttons used
Audio level indicator
Adjusting both channels together (BOTH) Adjusting both channels separately (INDEPENDENCE)
Ⅵ
To raise the recording level
Ⅵ
To adjust the Channel 1 level
ⅥTo lower the recording level ⅥTo adjust the Channel 2 level
SET
SET
SET
SET
Press the 6button while holding the 8
or
tbutton to raise the audio recording levels
for Channel 1 and Channel 2
simultaneously.
Press the 7button while holding the 8or
tb
utton to lower the audio recording levels
for Channel 1 and Channel 2
simultaneously.
Press either the 6 or
7 button while
holding the 8 button.
Pressing the 6button raises the recording
level.
Pressing the 7button lowers the recording
level.
Press either the 6 or 7 button while
holding the
t button.
Pressing the 6button raises the recording
level.
Pressing the 7button lowers the recording
level.
Returning Audio Recording Levels to Default Settings (UNITY MODE)
ⅥPress and hold the 8andtbuttons simultaneously to return the audio recording levels to their default settings (i.e., unity gain).
● Both of the audio recording levels will be fixed at the default setting.
36
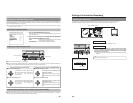
Settings & Controls for Recording
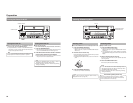
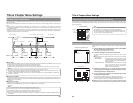
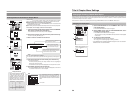
Checking the Video Input
Use the monitor connected to the VIDEO LINE OUT terminal to confirm that the input video signal is as required.
The following procedure will allow you to monitor the quality at which the video will be recorded to a DVD.
VIDEO AUDIO
IN
IN
OUT
IN
OUT
CH1
2
USB
DV IN/OUT
SIGNAL
LAN
GND
4dB
8dB
INPUT
LEVEL
LINE
Y/C
VIDEO LINE OUT terminal
Monitor screen
Signal Connections
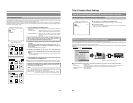
REV
STOP PLAY
DVDRECORDER
BD-X200
FWD PAUSE REC
BUSY
OPEN/CLOSE
TOP
MENU MENU
OPTIONDV Y/CLINE
SET UP
TITLE
DOLBY DIGITAL
LPCMMPEG
CHAPTER
SET
Connect the VIDEO LINE OUT terminal to the monitor.
Procedure
Ⅵ Press and hold the REC button for at least 2 seconds while the DVD
recorder is stopped or inserted with no disc. While this button is being
held, input signal encoded/decoded in MPEG will be output via the VIDEO
OUT terminal on the rear panel.
● This function allows the quality of the video to be confirmed before recording
to a DVD.
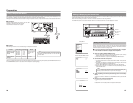
REC button
Note
Audio will be muted at this time.
The bit-rate setting value is
indicated on the LCD display.
ENCODING XX
Bit-rate value