


39
Recording with the Front Panel
BD-X200 recording operations can be carried out in two different ways — namely, using the buttons provided on the front panel and
using the on-screen REC CONTROL panel. In the latter case, furthermore, recording operations can be performed using a keyboard
and mouse. The following section, however, will provide a description of recording using the front panel buttons.
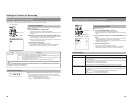
On a DVD, the section of video recorded between the start of recording and pressing of the STOP button to end recording is stored
as a single title, and a unique title number is assigned to each of these sections. A single disc can contain up to 99 different titles.
In addition, each title can be separated into a number of different chapters by inserting chapter marks at the appropriate points, and
each title can contain up to 99 chapters.
Information relating to titles and chapters is stored on a disc in the form of title and chapter menus. When the disc is being played,
therefore, the title and chapter menus can be used to access specific sections of stored video and audio.
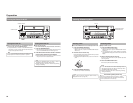
OPERATE
PHONES REV
STOP PLAY
DVDRECORDER
BD-X200
FWD PAUSE REC
BUSY
OPEN/CLOSE
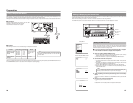
TOP
MENU MENU
OPTION DV Y/CLINE
SET UP
AUDIO
CH1
CH2
TITLE
DOLBY DIGITAL
LPCM MPEG
CHAPTER
SET
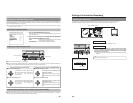
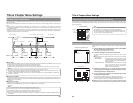
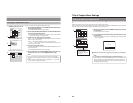
LCD display
STOP button
PAUSE button
REC button
OPEN/CLOSE button
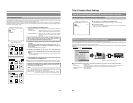
ⅥInsert a disc that can be recorded on.
1.
With the DVD recorder stopped, make all of the required settings
and adjust the audio recording levels.
2.
Start recording.
This is done by pressing the REC and PLAY buttons simultaneously.
3.
Pause recording.
This is done by pressing the PAUSE button.
● The DVD recorder will adopt Recording Pause mode and a chapter mark will
be inserted at the current position.
A number of different methods can also be used for the manual or automatic
insertion of chapter marks. (☞
Page 40)
4.
Restart recording.
Press the PLAY or PAUSE button.
● Recording will begin once again and a new chapter will be created in the
current title.
5.
End recording (i.e., close the title)
Press the STOP button when either recording or paused.
● The action of the DVD recorder following the end of recording depends on
the setting of EDIT MENU from the SYSTEM MENU screen.
DISABLE : Recording is ended and the chapter menu is created using
preset settings (i.e., the title is closed).
ENABLE : The THUMBNAIL EDIT screen will appear. This screen can be
used to modify the chapter menu’s display style, to change the
thumbnails used, to input chapter names, and to perform other
similar functions. For more details, refer to page 47.
Ⅵ If additional recording is to be carried out, repeat steps
1
through
5
above.
● In such a case, the subsequent recording is stored as a new title.
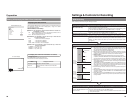
000 min
04/05/04
11:20:00
TITLE 1 0:11:22
CHAPTER
1 0:11:22
REC
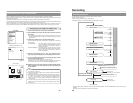
Monitor display
Title and chapter numbers
Remaining time
Notes
● A maximum of 10 minutes will be
required to complete title closing.
● The remaining time available for
recording on a disc will be displayed
on the monitor. Note that this is to be
used as a general guide, not as an
exact figure. (DISPLAY and REMAIN
from the DISPLAY MENU screen must
both be ON for this figure to be
displayed.)
● During the recording process, the
current title number and chapter
number are displayed on the monitor.
(DISPLAY and TITLE/CHAPTER from
the DISPLAY MENU screen must both
be ON for these numbers to be
displayed.)
40
Recording
Recording with the Front Panel (continued)
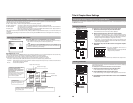
6.
End recording and remove the disc.
Depending on how the disc will be used, one of two different procedures is
implemented at this time.
● If more content will be recorded to the disc using this DVD recorder:
Simply press the OPEN/CLOSE button and remove the disc. (Do not finalize
the disc before it is removed.)
● If the disc is to be played on this DVD recorder or on a different DVD
player:
Finalize the disc, press the OPEN/CLOSE button, and then remove the disc.
For more details regarding finalizing, refer to page 42.
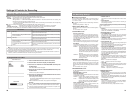
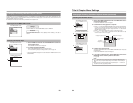
MENU
MANUAL
SET INTERVAL
Every05Min
TOTAL CONTENTS TIME
NO USE
ENCODE QUALITY (Mbps)
4.4
AUDIO ENCODE
LPCM
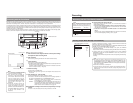
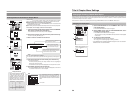
RECORDER MENU (1/2)
CHAPTER CREATION
RECORDER MENU (1/2) screen
Inserting Chapter Marks Manually or Automatically
In addition to pausing the recording, a number of different manual and automatic
methods can be used to insert chapter marks.
The actual method to be used is determined by CHAPTER CREATION and SET
INTERVAL from the RECORDER MENU (1/2) screen.
● If chapter marks are to be inserted manually at any point, set CHAPTER
CREATION to MANUAL.
Chapter marks can then be inserted by pressing the REC button while recording.
● If chapter marks are to be inserted automatically, first of all set CHAPTER
CREATION to AUTO. Then use SET INTERVAL to set a time (in minutes) for
chapter mark insertion.
The DVD recorder will insert chapter marks at the corresponding intervals during
recording.
Notes
● The frame at which a chapter mark is inserted will be used for the
corresponding thumbnail in the chapter menu. When EDIT MENU from the
SYSTEM MENU screen is set to ENABLE, the frames used for thumbnails
can be modified on the THUMBNAIL EDIT screen that appears automatically
at the end of recording.
● Each title can contain up to 99 chapters.
● In certain cases, the frames used for chapter menu thumbnails may differ
slightly from the exact frames at which the corresponding chapter marks
were inserted.
Note
When recording is stopped or a title is
closed, the state of progress will be
indicated on-screen using a progress bar.
REC STOP
Recording stopped Title closing
Progress bar
TITLE CLOSE