


73
4.
Sender device
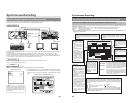
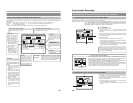
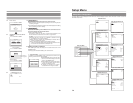
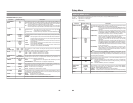
The sender device will begin searching for receiver devices.
● When connection has been completed, a dialog box for confirming the start
of dubbing will appear.
●
The IP address of the identified receiver device will be displayed in the dialog
box for confirming the start of dubbing.
5.
Sender device
To proceed with dubbing, select EXECUTE in the confirmation box for
the start of dubbing and press the SET button.
● DVD to DVD dubbing will begin.
As dubbing is carried out, the state of progress will be displayed on the
monitor connected to each device in the form of a progress bar.
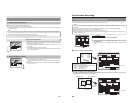
6.
Dubbing proceeds to completion.
When dubbing has ended, the display for the sender device returns to the
DUBBING screen.
Finalizing is performed automatically by the receiver device.
State of
progress
Confirmation box for the start of
dubbing
During Dubbing
DUBBING MENU screen
4.
6.
5.
Sender device
Receiver device
DVD
†
DVD SENDER
RECEIVER Searching . . .
SENDER IP ADDRESS † 192:168:000:002
ABORT
DVD
†
DVD SENDER
DUBBING
ABORT
DVD
†
DVD RECEIVER
DUBBING
ABORT
MENU
DVD † DVDEXECUTE
DUBBING
DVD
†
DVD SENDER
DUBBING START
SENDER IP ADDRESS † 192:168:000:002
RECEIVER IP ADDRESS † 192:168:000:003
EXECUTE
CANCEL
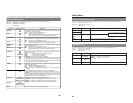
Notes
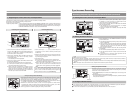
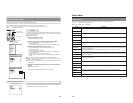
● Dubbing will not be carried out if CANCEL is selected from the
confirmation box for the start of dubbing.
●
When dubbing a complete disc, approximately 90 minutes will be
required to complete the process.
● Do not disconnect any cables during the dubbing process.
If cable are accidentally disconnected, both devices should be turned
off once and then restarted before subsequent use.
To cancel dubbing:
If ABORT from the DUBBING screen is selected and confirmed, the
following confirmation box will be displayed.
● Select EXECUTE and then press the SET
button to cancel the dubbing process and
return to the DUBBING menu.
● Select CANCEL and press the SET button
to close the confirmation window without
canceling the dubbing process.
● If dubbing is canceled, the partially-
recorded DVD will no longer be usable.
DVD
†
DVD SENDER
EXECUTE
CANCEL
Aborting makes the media a UNUSABLE !
RECIEVER disc cannot be re-used.
74
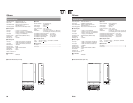
Setup Menu
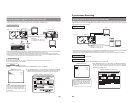
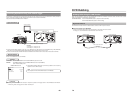
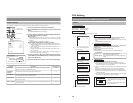
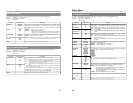
Setup Menu Configuration
The Setup Menu screen is displayed on both the monitor and LCD display. As shown below, this screen is used to access the
BD-X200’s setup menus.
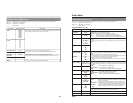
MENU
STYLE
TYPE1
1
1
TITLE PATTERN
CHAPTER PATTERN
PRESET STYLE MENU
MENU
HOST NAME
bdx200
STATIC
IP ADDRESS SETTING
255..255.255.0
192.168.0.254
192.168.0.2
IP ADDRESS
SUBNET MASK
DEFAULT GATEWAY
MAC ADDRESS
NETWORK MENU
99.99.99.99.99
MENU
REMOTE SELECT
9PIN(MASTER)
OFF
REC CONTROL
REMOTE MENU
MENU
FINALIZE
CANCEL
CANCEL
DISC ERASE
DISC MENU
MENU
DVD † DV D
DUBBING
EXIT
DISC MENU
INPUT SELECT
SYSTEM
PRESET STYLE
RECORDER
REMOTE
DISPLAY
CLOCK ADJUST
DUBBING
NETWORK
MENU
INPUT SELECT
LINE
INPUT SELECT MENU
MENU
SETUP
OFF
TEST SIGNAL
OFF
FACTORY SETTING
CANCEL
KEYBOARD STYLE
ENGLISH
EDIT MENU
ENABLE
TOTA L RECORDING TIME
5 Hour 30 Min
SYSTEM MENU
MENU
CHAPTER CREATION
MANUAL
SET INTERVAL
Every05Min
TOTA L CONTENTS TIME
NO USE
ENCODE QUALITY (Mbps)
4.4
AUDIO ENCODE
LPCM
ASPECT
AUTO
RECORDER MENU (1/2)
BACK
Y/C TERMINAL MODE
S1
THUMBNAIL FORM
NORMAL
AUDIO CHANNEL (DV)
1,2ch † 1,2ch
AUDIO REC VOLUME MODE
BOTH
DISC IN ACTION
MENU
TITLE END
MENU
RECORDER MENU (2/2)
MENU
DISPLAY
ON
TITLE/CHAPTER
ON
RECORDER MODE
TIME+DATE
ON
TIME/DATE
REMAIN
ON
DATE STYLE
MM/DD/YY
CANCEL
DISPLAY MENU
MENU
DATE
04/12/04
10:00
TIME
CLOCK ADJUST MENU
FF/REW
REM FF/REW MODE
Setup Top Menu
DISC MENU Screen
SYSTEM MENU Screen
RECORDER MENU (1/2) Screen
DISPLAY MENU Screen
DUBBING MENU Screen
INPUT SELECT MENU Screen
PRESET STYLE MENU Screen
RECORDER MENU (2/2) Screen
REMOTE MENU Screen
CLOCK ADJUST MENU Screen
NETWORK MENU Screen
(U-model only)
(DD/MM/YY:
E-model only)