


30
Settings & Controls for Recording
Preparing a Disc for Recording
Ⅵ
This DVD recorder is capable of recording to DVD-R and DVD-RW (in video mode).
DVD-R : Only discs that conform with DVD-R Standard 2.0 (video mode) can be used.
DVD-RW
: Discs of Version 1.1 or later can be used.
Although Version 1.1 of DVD-RW standards allows the selection of video mode and VR mode for recording, this
DVD recorder performs recording in video mode only.
*Version 1.0 of the DVD-RW standards does not support video-mode recording, and for this reason, the corresponding
discs cannot be used.
ⅥIn terms of recording characteristics, DVD-R and DVD-RW (video mode) differ as follows.
DVD-R : Each disc can be recorded only once. Erasing of data and re-recording are not possible.
DVD-RW (video mode) : After viewing a disc, all data can be erased and it can be used to record new content.
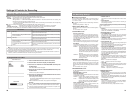
The condition of the disc being used will dictate the available recording options as follows.
Disc condition Recording operations
DVD-R New content can be recorded. A new title is created and recording
starts from that title’s first chapter.
A new title is created in the unused section of the disc, and recording
starts from that title’s first chapter.
DVD-RW New content can be recorded. A new title is created and recording
starts from that title’s first chapter.
A new title is created in the unused section of the disc, and recording
starts from that title’s first chapter.
Erase the recorded data (as described below), and then record
new content.
Blank disc
A disc recorded on using this DVD recorder
but not yet finalized.
Blank disc
A disc recorded on using this DVD recorder
but not yet finalized.
A recorded disc from which data is to be
erased.
Notes
● If data has been erased from a disc using a different DVD recorder, it may not be possible to record new content to it using
this recorder. To avoid this type of situation, ensure that this DVD recorder is used to erase recorded data.
● New content cannot be recorded to discs that have been finalized.
● Regardless of whether or not finalization has been carried out, it will not be possible to use this DVD recorder to record new
content to a DVD-R or DVD-RW that has been recorded on using other devices.
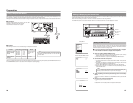
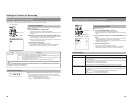
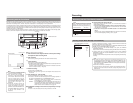
Erasing All Data From a Disc
1.
Insert the DVD-RW from which data is to be erased.
2.
Press the SET UP button to display the Setup Menu.
3.
Use the 7 and6 buttons to select DISC MENU and then press
the SET button.
● The DISC MENU screen will appear.
4.
Use the 7
and6buttons to select DISC ERASE and then press
the SET button.
● A list of setting values will appear.
5.
Use the 7 and 6 buttons to select EXECUTE from the list and
then press the SET button.
● The erasing of data will begin.
The message “DISC ERASE” appears and the state of progress is displayed
using a progress bar.
● When all data has been erased, the progress bar will disappear.
MENU
FINALIZE
CANCEL
EXECUTE
DISC ERASE
DISC MENU
DISC ERASE
DISC MENU screen
CAUTION
● All of the data recorded to the disc will be erased in this process. Before
starting, therefore, confirm that no important data is stored on this disc.
● Under no circumstances should the power be turned off or the power cord
disconnected while data is being erased.
31
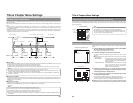
Pre-Recording Settings
ⅥRecorder switch settings
Use the AUDIO INPUT LEVEL switch on the DVD recorder’s
rear panel to select the reference input level for analog audio
(i.e., +4 dB or –8 dB).
Ⅵ
The following screens are used to make settings relevant to
recording.
(Screen setting methods: ☞
Page 75)
● INPUT SELECT MENU screen
This screen is used to select the audio and video signals to
be used.
For more details, refer to page 32.
● SYSTEM MENU screen
• SET UP (U-model only)
This parameter is set when an analog video signal (i.e.,
composite or YC separate) is being input to the DVD recorder.
Specifically, a setting is made to reflect whether or not the
input signal is a setup signal. SETUP should be set to ON if
it is a setup signal, or to OFF if it is not.
• TEST SIGNAL
Set this parameter to ON when the color bar output by the
DVD recorder’s internal signal generator is to be recorded.
• EDIT MENU
This parameter indicates whether or not a screen for menu
editing is to be displayed during title closing and finalizing.
ENABLE : The menu editing screen is to be displayed.
During title closing, this screen can be used to
modify the chapter menu’s
style and thumbnails
and also to insert chapter names. (
☞Page 47)
During finalizing, the menu editing screen allows
the title menu’s display style to be modified. (☞
Page 53)
DISABLE : The menu editing screen is not to be displayed.
In this case, the chapter menu is created using
preset values as part of title closing when
recording is ended.
● PRESET STYLE MENU screen
This screen is used to select the arrangement and background
style for thumbnails displayed on the tops menu. This DVD
recorder can store eight individual style type (i.e., TYPE1
through TYPE8), and the most suitable type should be selected
here.
For more details, refer to page 37.
● RECORDER MENU screen
The RECORDER MENU screen contains two different pages
of parameters.
RECORDER MENU (1/2) screen
•
CHAPTER CREATION
This parameter indicates whether chapters are to be created
automatically or manually.
MANUAL: Chapters will be created manually. To create a
chapter, press the REC button while recording.
AUTO : Chapters are to be created automatically. In this
case, the DVD recorder will create chapters at
the time intervals set using SET INTERVAL.
•TOTAL CONTENT TIME
This parameter is used to make a setting relevant to the
encoding (or compression) of video data.
A setting should be made here when the DVD recorder is to
automatically set the bit rate based on the recording time
and the remaining disc capacity. Specifically, this parameter
sets the recording time.
• ENCODE QUALITY
This parameter is used to manually set the bit rate for video
data.
• AUDIO ENCODE
This parameter is used to set the format for encoding (or
compressing) audio data.
For more details regarding the encoding of audio and video,
refer to pages 33, 34.
• ASPECT
This parameter is used to set the aspect for recorded video.
(AUTO, 4:3, LETTER BOX, or SQUEEZE)
RECORDER MENU (2/2) screen
• Y/C TERMINAL MODE
This parameter indicates whether the Y/C IN terminal’s
specification is S1 or S2. (Specifically, it selects the recording
method for the wide-screen discrimination signal.)
• THUMBNAIL FORM
This parameter selects the method to be used for thumbnail
conversion when recording a wide-screen signal.
• AUDIO CHANNEL (DV)
This parameter is to be set when recording an audio signal
from the DV IN/OUT terminal.
Specifically, it indicates whether the signals from channels 1
and 2 or from channels 3 and 4 are to be recorded.
• AUDIO REC VOLUME MODE
This parameter is used to select the method for adjustment
of audio recording levels. Specifically, both channels can be
adjusted while maintaining the same level (BOTH), or each
channel can be adjusted independently (INDEPENDENCE).
For more details regarding methods for the adjustment of
audio recording levels, refer to page 35.
• DISC IN ACTION
This parameter’s setting is used during the recording of discs
to indicate the action to be taken when a completed (i.e.,
finalized) disc is inserted into this DVD recorder or a different
DVD player.
MENU : The title menu is displayed.
TITLE : Playback of the main content begins.
• TITLE END
This parameter’s setting is used during the recording of discs
to indicate the action to be taken when playback of a title on
a completed disc has ended.
MENU : The title menu is displayed.
REPEAT : Play back from the top of the title begins.
● REMOTE MENU screen
• REMOTE SELECT
This parameter should be set to OFF when not controlling
the DVD recorder via the RS-422A REMOTE terminal or the
DV IN/OUT terminal.
Alternatively, the REMOTE CONTROL screen can be
displayed by setting this to 9PIN (MASTER), DV (MASTER),
or DV (SLAVE). (☞ Page 60)
•
REC CONTROL
This parameter indicates whether or not the REC CONTROL
panel is to be displayed constantly on-screen when a
recordable disc has been inserted.
Set this to ON when using a keyboard and/or mouse.