


10
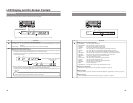
Component Names & Functions
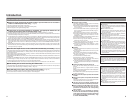
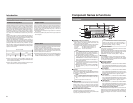
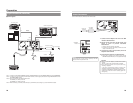
Front Panel (continued)
OPERATE
PHONES REV
STOP PLAY
DVD RECORDER
BD-X200
FWD PAUSE REC
BUSY
OPEN/CLOSE
TOP
MENU MENU
OPTION DV Y/C LINE
SET UP
AUDIO
CH1
CH2
TITLE
DOLBY DIGITAL
LPCM MPEG
CHAPTER
SET
9
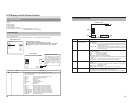
REV button and indicator
● When this button is pressed in Playback or Fast-Forward
Play mode, the DVD recorder switches to fast-reverse play.
If pressed again during fast-reverse play, the REV button
toggles the speed of fast-reverse between ×3 and
×15.
● When this button is pressed in Still or Slow-Forward Play
mode, the DVD recorder switches to slow-reverse play. If
pressed again during slow-reverse play, the REV toggles
the speed of slow-reverse between ×0.5 and
×0.06.
● The REV indicator is lit up during fast-reverse and slow-
reverse play.
0
STOP button
● This button has the following effect when pressed in
Recording or Recording Pause mode.
If EDIT MENU from the SYSTEM MENU screen is set to
DISABLE, the DVD recorder stops recording (i.e., it
performs title closing).
If EDIT MENU from the SYSTEM MENU screen is set to
ENABLE, the DVD recorder stops recording and the
THUMBNAIL EDIT screen is displayed. It will then be
possible to modify the chapter menu.
● When the STOP button is pressed in Playback mode, the
D
VD recorder stops playback.
!
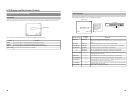
PLAY button and indicator
● If this button is pressed together with the REC button while
a recordable disc is inserted into the DVD recorder,
recording will be started.
● When the PLAY button is pressed in Recording Pause
mode, the DVD recorder restarts recording.
● If a finalized disc has been inserted into the DVD recorder,
pressing of this button will start playback.
● The PLAY indicator is lit up in Recording and Playback
modes.
@
FWD button and indicator
● When this button is pressed in Playback or Fast-Reverse
Play mode, the DVD recorder switches to fast-forward play.
If pressed again during fast-forward play, the FWD button
toggles the speed of fast-forward between ×3 and
×15.
● When this button is pressed in Still or Slow-Reverse Play
mode, the DVD recorder switches to slow-forward play. If
pressed again during slow-forward play, the FWD toggles
the speed of slow-forward between ×0.5 and ×0.06.
● The FWD indicator is lit up during fast-forward and slow-
forward play.
#
PAUSE button and indicator
● If this button is pressed during recording, the DVD recorder
switches to Recording Pause mode. A chapter mark is
inserted at the corresponding point.
● If this button is pressed during playback, the DVD recorder
s
witches to Still mode and freezes playback. If the PAUSE
button is then pressed again in Still mode, the DVD recorder
will advance playback by a single field.
● The PAUSE indicator is lit up in Recording Pause and Still
modes.
$
REC button and indicator
● If this button is pressed together with the PLAY button in
Stop mode, recording will be started.
• If the current disc is blank or title closing has been carried
out, a new title will be created and recording will start at
Chapter 1.
● When this button is pressed during recording, a new chapter
will be setup within the continuous video data.
● If this button is pressed and held for more than 2 seconds
while the DVD recorder is stopped or inserted with no disc,
input signal encoded/decoded in MPEG will be output via
the VIDEO OUT terminal on the rear panel. This will continue
for as long as the button is held, and it allows the DVD
recording quality to be confirmed. Audio will be muted at
this time.
●
The REC indicator is lit up in Recording and Recording
Pause modes.
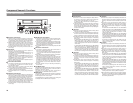
%
TOP MENU button
If this button is pressed while the DVD recorder is in a playback
condition, the current DVD’s top menu (or title menu) will be
displayed on the monitor screen.
If the DVD does not contain a title menu, nothing will be
displayed when the TOP MENU button is pressed.
^
MENU button
If this button is pressed while the DVD recorder is in a playback
condition, the chapter menu for the currently selected title
will be displayed on the monitor screen.
If the DVD title does not contain a chapter menu, nothing will
be displayed when the MENU button is pressed.
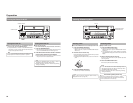
90!@#$%^
(
)
*
&
⁄
¤
11
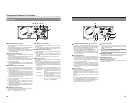
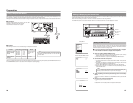
&
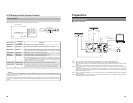
SET UP button
●
This button can be pressed to display the Setup Menu on
the monitor. A wide range of different menu settings can
then be made via the Setup Menu. (☞ Page 74)
In addition, the SET UP button can be pressed again to
hide the Setup Menu.
● If the SET UP button is pressed in Recording or Recording
Pause mode, setting data relevant to recording (i.e., video
bit rate and audio encoding format) will be displayed on-
screen. In addition, the SET UP button can be pressed again
to hide this information.
*
[6] button
● This button is used to select menu items or setting values
when the Setup Menu is displayed.
● If a title menu or chapter menu is displayed, this button can
be used to select a menu number for playback. Specifically,
pressing of this button moves the selection position upward.
●
The 6 button can be used to adjust the audio recording
levels when the DVD recorder is stopped or in Recording
Pause mode.
• If AUDIO REC VOLUME MODE from the RECORDER
MENU (2/2) screen is set to BOTH and this button is
pressed while either the 8
ortbutton is being held, the
audio recording levels for both Channel 1 and Channel 2
will increase.
• If AUDIO REC VOLUME MODE from the RECORDER
MENU (2/2) screen is set to INDEPENDENCE and this
button is pressed while the 8 button is being held, the
audio recording level for Channel 1 will increase. Similarly,
if the 6 button is pressed while the t b
utton is being
held, the audio recording level for Channel 2 will increase.
(
[7] button
● This button is used to select menu items or setting values
when the Setup Menu is displayed.
●
If a title menu or chapter menu is displayed, this button can
be used to select a menu number for playback. Specifically,
pressing of this button moves the selection position
downward.
● The 7 button can be used to adjust the audio recording
levels when the DVD recorder is stopped or in Recording
P
ause mode.
• If AUDIO REC VOLUME MODE from the RECORDER
MENU (2/2) screen is set to BOTH and this button is
pressed while either the 8ortbutton is being held, the
audio recording levels for both Channel 1 and Channel 2
will decrease.
•
If AUDIO REC VOLUME MODE from the RECORDER
MENU (2/2) screen is set to INDEPENDENCE and this
button is pressed while the 8
button is being held, the
audio recording level for Channel 1 will decrease. Similarly,
if the 7 button is pressed while the
t button is being
held, the audio recording level for Channel 2 will decrease.
)
[8] button
● If a title menu or chapter menu is displayed, this button can
be used to select a menu number for playback. Specifically,
pressing of this button moves the selection position to the
left.
● This button can be pressed while the DVD recorder is
playing to move playback to the start of the current chapter.
● The 8 button can be used to adjust the audio recording
levels when the DVD recorder is stopped or in Recording
Pause mode.
• If AUDIO REC VOLUME MODE from the RECORDER
MENU (2/2) screen is set to INDEPENDENCE and either
the 6 or 7 button is pressed while this button is being
held, the audio recording level for Channel 1 will be
adjusted accordingly.
• If AUDIO REC VOLUME MODE from the RECORDER
MENU (2/2) screen is set to BOTH and either the 6or
7
button is pressed while this button is being held, the audio
recording levels for both Channel 1 and Channel 2 will be
adjusted accordingly.
• If this button is pressed together with the t
button, the
audio recording levels will be returned to their default
settings (i.e., unity gain).
⁄
[t] button
● If a title menu or chapter menu is displayed, this button can
be used to select a menu number for playback. Specifically,
pressing of this button moves the selection position to the
right.
● This button can be pressed while the DVD recorder is
playing to move playback to the start of the next chapter.
● The t
button can be used to adjust the audio recording
levels when the DVD recorder is stopped or in Recording
Pause mode.
• If AUDIO REC VOLUME MODE from the RECORDER
MENU (2/2) screen is set to INDEPENDENCE and either
the 6 or 7 button is pressed while this button is being
held, the audio recording level for Channel 2 will be
adjusted accordingly.
• If AUDIO REC VOLUME MODE from the RECORDER
MENU (2/2) screen is set to BOTH and either the 6
or7
b
utton is pressed while this button is being held, the audio
recording levels for both Channel 1 and Channel 2 will be
adjusted accordingly.
• If this button is pressed together with the 8
button, the
audio recording levels will be returned to their default
settings (i.e., unity gain).
¤
SET button
● This button is used to confirm the selection of menu items
or setting values when the Setup Menu is displayed.
● When this button is pressed during normal screen display,
the counter from the DVD recorder
’s LCD display will switch
to display of either the elapsed recording/playback time or
the remaining disc/title time.