


32
Settings & Controls for Recording
Selecting & Confirming Input Signals
The selection of audio and video input signals is carried out from the INPUT SELECT MENU screen as described below. In
addition, the type of input signals that have been selected can be confirmed on the front panel.
Selecting Input Signals
ⅥStop the DVD recorder.
1.
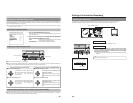
Open the INPUT SELECT MENU screen.
q Press the SET UP button to display the Setup Menu.
w Select INPUT SELECT using the
6 and
7 buttons and then press the
SET button.
2.
Make the required settings on the INPUT SELECT MENU screen.
q Select the parameter to be set using the 6 and
7 buttons, and then
press the SET button to display a list of possible settings.
w Select the required setting using the 6and 7
buttons, and then press
the SET button to adopt this setting.
3.
Complete the setting process.
To
do so, carry out one of the following procedures.
• Select MENU and press the SET button to return to the Setup Menu.
•
Press the SET UP button to return to the normal screen display.
MENU
INPUT SELECT
LINE
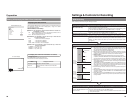
INPUT SELECT MENU
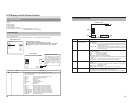
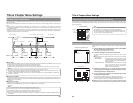
INPUT SELECT MENU screen
Video input indicators
SET UP button
SET button
BUSY
OPEN/CLOSE
TOP
MENU MENU
OPTIONDV Y/CLINE
SET UP
SET
Item Description
INPUT SELECT This parameter is used to select the audio and video input signals.
LINE : The composite video signal from the VIDEO LINE IN terminal and the analog audio signals
from the AUDIO IN terminals are to be used.
Y/C : The YC separate signal from the Y/C IN terminal and the analog audio signals from the
AUDIO IN terminals are to be used.
DV : The audio and video signals from the DV IN/OUT terminal are to be used.
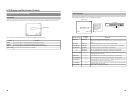
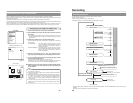
Confirming Input Signals
ⅥThe type of video signals that have been selected for input can be confirmed
using the video input signal indicators on the DVD recorder’s front panel.
Specifically, the indicator corresponding to the type of input signal selected
using INPUT SELECT will be lit up or flashing.
Lit : The selected signal is being received.
Flashing : The selected signal is not being received.
OPTION
DV
LINE
Y/C
Note
Setting of INPUT SELECT will not be possible when REMOTE SELECT from the REMOTE MENU screen has been set to
DV(MASTER), DV(SLAVE), or DV(TRIGGER).
DV signals will be used for input at these times.
33
Setting the Encoding Format for Audio & Video
The setting of encoding formats for audio and video is carried out from the RECORDER MENU (1/2) screen as described below.
Setting Encoding Formats
ⅥStop the DVD recorder.
1.
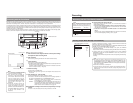
Open the RECORDER MENU (1/2) screen.
q
Press the SET UP button to display the Setup Menu.
w Select RECORDER using the 6and7buttons and then press the SET
button.
2.
Make the required settings on the RECORDER MENU (1/2)
screen.
q Select the parameter to be set using the 6
and 7 buttons, and then
press the SET button to display a list of possible settings.
w Select the required setting using the 6and
7 buttons, and then press
the SET button to adopt it.
3.
Complete the setting process.
To do so, carry out one of the following procedures.
•
Select MENU and press the SET button to return to the Setup Menu.
• Press the SET UP button to return to the normal screen display.
MENU
CHAPTER CREATION
MANUAL
SET INTERVAL
Every05Min
TOTAL CONTENTS TIME
NO USE
ENCODE QUALITY (Mbps)
4.4
AUDIO ENCODE
LPCM
RECORDER MENU (1/2)
ASPECT
AUTO
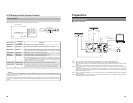
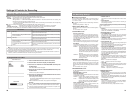
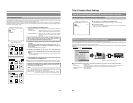
RECORDER MENU (1/2) screen
SET UP button
SET button
BUSY
OPEN/CLOSE
TOP
MENU MENU
OPTIONDV Y/CLINE
SET UP
SET
Video Encoding
Item Description
TOTAL CONTENTS TIME If you already know the duration of the video to be recorded, this parameter can be set to the
corresponding time to allow your BD-X200 to select the optimum encoding bit rate. (Make a setting
in hours and minutes.)
●
If the recording time is set using this parameter, ENCODE QUALITY will be set automatically,
and this setting may not be modified manually.
●
If this function is not to be used, set it to NO USE.
When this setting is made, ENCODE QUALITY will be returned to its previous setting.
ENCODE QUALITY (Mbps) This parameter can be set when TOTAL CONTENTS TIME has been set to NO USE.
Specifically, it allows direct setting of the encoding bit rate (i.e., the amount of data per second).
Large values increase the quality of the video; however, this also increases the overall data size.
Setting range:
The range of values that can be set depends on the audio encoding format.
LPCM : 4.0 to 7.8 Mbps (in 0.2 Mbps steps)
DOLBY DIGITAL: 2.0 to 9.0 Mbps (in 0.2 Mbps steps)