


VR-N100U USERS MANUAL
Page 21 of 98 All Items Are Subject To Change Without Notice Feb. 2004 Rev 1.0
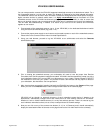
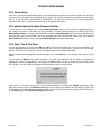
2.4.5. Step 4: Setting Up the Backchannel
Once VR-N100U has been successful installed onto your network, the next step is to configure the “back channel” (also
referred as the camera or video channel) along with the networked cameras.
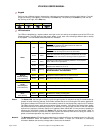
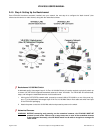
Backchannel 10/100 Mbit Switch
A dedicated quality Unmanaged Layer 2 24-Port 10/100 Mbit Switch will now be required to physically attach up
to sixteen (16) VR-N100U supported networked cameras for each VR-N100U. The VR-N100U will communicate,
setup, and manage the networked cameras via this backchannel.
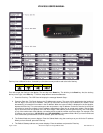
1. Utilizing the CAT5/CAT5e network cable, proceed to connect LAN2 of VR-N100U to a one of the ports (e.g.
port 17) of the dedicated Unmanaged Layer 2 24-Port 10/100 Mbit Switch. Both cable and switch were part
of the VR-N100U packaging.
2. Attach the power cord to the 10/100 Mbit switch and proceed to power on the switch.
Networked Cameras
WARNING:
BEFORE connecting and powering on the networked cameras, the VR-N100U MUST BE
powered on and online. Failure to do so may cause one or more of the networked cameras
to be configured incorrectly, thus VR-N100U would not be able to recognize or manage the
video device.