


VR-N100U USERS MANUAL
Page 22 of 98 All Items Are Subject To Change Without Notice Feb. 2004 Rev 1.0
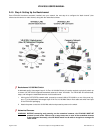
You can now proceed to connect the VR-N100U supported networked cameras to the backchannel switch. For a
list of supported cameras, you can refer to section 5.2 Network IP Cameras for the latest updated information.
The networked cameras can be either native IP-based or traditional analog-based that utilize special analog-to-
digital converter devices to network enable them. It is highly recommended that we first attach all of the
networked cameras to the VR-N100U backchannel locally (physically near VR-N100U) in order to ensure that
they are all working properly and are recognized by VR-N100U prior to installing them into their final destination.
This will make the troubleshooting, if needed, a lot easier as you have all of the cameras and VR-N100U
together at one location.
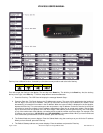
3. Connect each of the networked cameras (up to 16 per VR-N100U) to the dedicated backchannel switch
using CAT5/CAT5e Ethernet cables (e.g. ports 1~16).
4. Connect the proper power supply to each camera and proceed to power on each of the networked cameras.
Please refer to the camera’s owners manual for detail specifications.
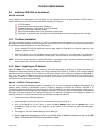
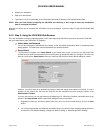
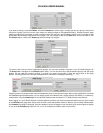
5. Using your web browser, proceed to log into VR-N100U as an administrator and select the Cameras
administration page.
6. Prior to viewing the networked cameras, your workstation will need to have the proper Java Runtime
Executable from Sun Microsystems installed and loaded. VR-N100U should automatically prompt you with a
Java installation window if the correct JRE is not discovered on your system. Please proceed to ACCEPT
the installation of Java onto your system. This process will take a few minutes and may require a reboot of
your workstation, but should be a one-time procedure.
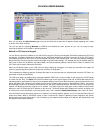
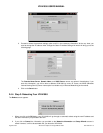
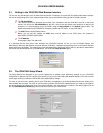
7. After Java has been successfully installed, log back into VR-N100U and return to the Camera utilities page.
When you click on the Discover button under Configure/View Details for All Cameras page,
VR-N100U will go through an automatic discovery of each networked camera device it detects on its
backchannel, automatically configure them and include them as valid network cameras for VR-N100U.
Whether it is one or sixteen network cameras, it is a very fast and easy process. There is no need to log into
each individual networked camera (one at a time) to setup and save its network settings.
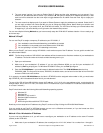
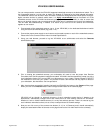
8. Now you can click on any of the camera view buttons (2, 4, 8 or 16 Cameras) and it should automatically
display the associated number of cameras on the page as well as the live video feed from the camera(s).