


20 Initial Setup (cont’d)
GUIDE Plus+
®
System Setup
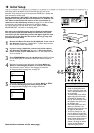
1
An introduction to the GUIDE Plus+
®
System will appear.
Read this, then press OK to continue through these introductory
menus.The remaining menus help you set up the GUIDE Plus+
®
System, which provides free TV programming information through
the Recorder. See pages 43-47.
2
First you will be asked about your country, zip code, Cable TV ser-
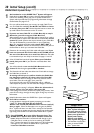
vice, and Cable Box availability. Use 8CH+ and 9CH- to choose
an answer, then press OK. Use the Number buttons to enter the
zip code. Follow the instructions on the TV screen.
3
If you do not have Cable TV or a Cable Box, skip to step 8.
Otherwise, you will set up your Cable Box next.
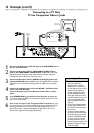
When asked to enter your Cable Box output channel: If you used an
RF coaxial cable to connect the Cable Box to the Recorder, choose
channel 2, 3, or 4. (Choose the output channel of your Cable Box.
This may be indicated by a manual switch on your Cable Box.)
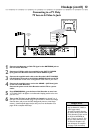
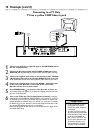
Or, if you used Audio and Video cables, choose EXT2, EXT 1,
CAM 1, or CAM 2. Choose the channel that matches the jacks on
the Recorder to which you connected the Cable Box.
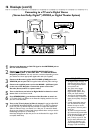
4
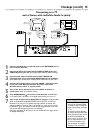
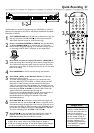
Directions for connecting the G-Link cable will appear next. If you
have not connected the G-Link cable to the G-LINK jack on
the rear of the Recorder, do so now. Press OK when the cable
is connected and you are ready to continue. See pages 11 and 18.
5
A list of Cable Box brands will appear. Select your Cable Box
brand, then press OK. If your brand is not listed, select “Not
Listed.”
6
You will be advised to turn on the Cable Box and set it to
channel 2. After doing this, press OK to continue.
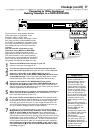
7
The Recorder will test codes that allow the G-Link cable to change
the Cable Box to channel 9.
A message will ask you to confirm whether the Cable Box
has changed to channel 9. If it does, select Yes. Press OK.
If the Cable Box does not change to channel 9, check all connec-
tions. Select “Test this code again,” then press OK.
Or, choose No and press OK.The Recorder will try a different
code. Repeat this process until the Cable Box changes to channel 9.
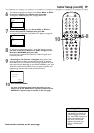
8
“Confirming your settings” will appear. When the information is
correct, choose “Yes, end setup,” then press OK.
If the settings are incorrect, choose “No, repeat setup process,” then
press OK.You will go through the setup again. Change any incorrect
information.
9
Helpful information about the GUIDE Plus+
®
System will appear.
Press OK to continue.
A congratulations message will appear, prompting you to select
“Watch TV.” Press OK again.You are finished!
Within a few seconds, the DVD Recorder will turn itself off,
then on again. When the Recorder turns on again, the GUIDE
Plus+
®
System will show “no data.” This is normal, as the Recorder
has not had time to receive programming data.To use the Recorder
right away, press GUIDE/TV to remove the GUIDE Plus+
®
System.
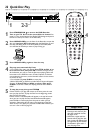
10
Press STANDBY
yy
to turn off the Recorder later. The
GUIDE Plus+
®
System data will be available in about 24
hours. When the Recorder is off, channels will change on your
Cable Box.This is normal, as the unit is searching for GUIDE
Plus+
®
System information. For best results, turn off the Recorder
overnight so it can receive the GUIDE Plus+
®
System data.
Leave the Cable Box turned on.
• By default, the GUIDE
Plus+
®
System will appear
first every time you turn on
the Recorder. To cancel this
feature, turn off the Auto
Display under Review
Options in the GUIDE
Plus+
®
System. See page 44.
• The Recorder must be off in
order to receive GUIDE
Plus+
®
System data.
Helpful Hints
STANDBY
REC/OTR
TIMER REC MODE PLAY MODE TV/DVD
MONITOR
•TV
DIM RETURN T/C
DISC MANAGER FSS SELECT
SUBTITLE
STOP TV VOLUME
PAUSESLOW
PLAY
AUDIO ANGLE ZOOM
GUIDE/TV
MUTECLEAR
`
CHCH
-
CHCH
+
OK
SYSTEM
DISCDISC
Ç
H Gk
MENU
1-9
7
10
C
A
B
L
E
B
O
X
C
A
B
L
E
B
O
X