


Chapter 3 Hardware Setup 31
To Install a PCI Card:
If using WinView/32 software, either
High Speed PCI or PCI(Timer) can be the selected
Interface type. This selection is accessed on the Hardware Setup|Interface tab page.
High Speed PCI allows data transfer to be interrupt-driven and gives the highest
performance in most situations. PCI(Timer) allows data transfer to be controlled by a
polling timer and is recommended when there are multiple devices sharing the same
interrupt. However, data transfer is slower in PCI(Timer) mode and data overrun more
likely. Also, PCI(Timer) cannot be used to continuously acquire small Regions of
Interest in asynchronous operation.
1. Review the documentation for your computer before continuing with this
installation.
2. To avoid risk of dangerous electrical shock and damage to the computer, verify
that the computer power is OFF and the computer is unplugged.
3. Follow your computer manufacturer's instructions for inserting the card into an
empty PCI slot.
4. After you have secured the computer cover, turn on the computer only. If an
error occurs at bootup, either the PCI card was not installed properly or there is
an address or interrupt conflict. Go to Chapter 10, Troubleshooting, page 74, for
instructions.
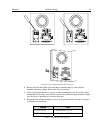
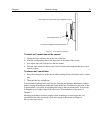
Connecting the TAXI (Camera to Computer) Cable
To Connect the TAXI Cable:
1. Connect one end of the TAXI
cable to the 9-pin port on the Interface card.
2. Tighten down the screws to lock the connector in place.
3. Connect the other end of the cable to the "High Speed Serial" port on the rear of
the camera.
4. Tighten down the screws to lock the connector in place.
Connecting the Camera to Power Supply Cable
Turn the Temperature/Power Supply unit power OFF (OFF = 0, ON = |) before
connecting or disconnecting the Camera to Power Supply cable.
To Connect the Camera to Power Supply Cable:
1. Verify that the Temperature/Power Supply unit power is OFF.
2. Connect male end of the Camera to Power Supply cable to the "To Camera" port
on the rear of the Temperature/Power Supply unit.
3. Tighten down the screws to lock the connector in place.
4. Connect the female end of the cable to the "From Power Supply" port on the rear
of the camera.
5. Tighten down the screws to lock the connector in place.
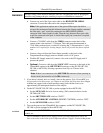
CAUTION
CAUTION