


Chapter 10 Troubleshooting 77
Excessive Readout Noise
Excessive readout noise with the intensifier off indicates possible moisture accumulation
in the CCD. This should be corrected promptly or permanent damage not covered by the
Warranty could occur.
Normal camera noise is a function of the gain setting and temperature as well as CCD
type, but is typically in the range of 1 ADU rms (6 ADU pk-pk). This is on top of offset
that typically is about 40 counts. Moisture accumulation produces a coarser noise with
many spikes ≥ 30 ADU. If these types of spikes occur, especially after the camera has
been in use for an extended period, turn off the system immediately. Have the unit
serviced by Princeton Instruments or an authorized service facility of Princeton
Instruments.
Fuses are not Correct for the Line Voltage
The operating line voltage is auto-sensed by the Temperature/Power Supply unit and will
automatically configure itself accordingly. However, the installed fuse will no longer be
correct. Depending on the fuse rating, this could result in inadequate protection for the
system or it could result in fuse failure.
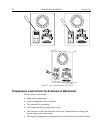
To Change the Fuses:
1. Unplug the line cord from the Power Input assembly at the rear of the
Temperature/Power Supply unit.
2. Insert a small screwdriver into the recess at the top of the Power Input assembly as
shown in Figure 27 and pry open the cover.
3. Use the screwdriver to loosen the fuse carrier. Note the orientation of the arrow and
then grasp the fuse carrier and pull it straight out of the Power Input assembly.
4. Remove the fuse and check to be sure its current rating is correct for the intended
operating voltage. If the fuse is incorrect or has failed, replace the fuse.
5. After verifying that the fuse is correct, or after installing the new fuse in the carrier,
should that be necessary, insert the fuse carrier back into the Power Input assembly.
Make sure the arrow is pointing in its original direction.
6. Return the Power Input assembly cover to its original position and snap it into place
to complete the procedure.
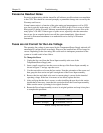
Voltage Fuse
105-125 V (US)
2 A slow-blow, ¼″x1¼″
210-250 V (Europe)
1 A slow-blow, ¼″x1¼″
Table 8. Voltage and Fuse Selection