


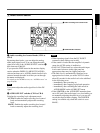

14 (GB) Chapter 1 Overview
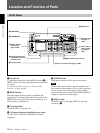
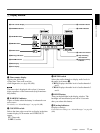
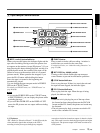
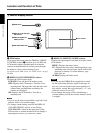
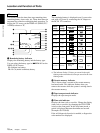
Location and Function of Parts
Chapter 1 Overview
6 F FWD (fast forward) button/indicator
When you press this button, the indicator lights and the
tape is fast forwarded. During fast forward, the picture
does not appear on the monitor (except EE pictures). If
you keep pressing this button during playback, fast-
forward or in playback pause mode, you can locate a
scene monitoring the picture (picture search).
You can change the tape transport mode in FF/REW
SPD on the VTR SET menu.
For details on the VTR SET menu, see “VTR SET menu” on
page 90 (GB).
Notes
• If you set the FF/REW SPD on the VTR SET menu
to SHUTTLEMAX, you can display the picture while
fast-forwarding the tape.
• If you set PB in EE/PB SET on the DISPLAY SET
menu, the EE pictures are not output while fast-
forwarding the tape.
7 END SEARCH button
Searches for the last part of the recorded image and
plays that part for five seconds. This function is used
when you record another image at the end of the
current image or check the last part of the recorded
image.
If you use a cassette without cassette memory and
remove the tape from the unit, the end search function
does not work. If you use a cassette with cassette
memory, the end search function continues to work.
However, if there is a blank portion at the beginning or
between the recorded portions, the end search function
may not work correctly.
8 DUP (duplicate) button/indicator
Used to duplicate a tape, including the time code.
During duplication, the indicator flashes.
For details on duplicate function, see “Duplication
(generating a work tape with the same time code)” on page
70 (GB).
When the INPUT SELECT selector is set to DV and a
DV signal is input, if you press only this button when
the unit is in the stop mode, the DUP indicator lights
and you can check the EE signals for image, sound and
time code. After checking them, press the STOP
button.
For details, see “DISPLAY SET menu” on page 84 (GB).
For details on the time code, see “DSR-50/50P time codes”
on page 62 (GB).
9 AUDIO DUB (audio dubbing) button/indicator
Use this button to dub the sound. The indicator flashes
while the sound is being dubbed.
For details on audio dubbing, see “Audio Dubbing” on
page 74 (GB).
When the INPUT SELECT selector is set to other than
DV, if you press only this button when the unit is in
the stop mode, the AUDIO DUB indicator lights and
you can check the EE sound signals. After checking
them, press the STOP button.
For details, see “DISPLAY SET menu” on page 84 (GB).
0 REC (record) button/indicator
When you start recording an image from an external
camera, press the PLAY button while holding this
button down. The unit is set to recording pause mode.
Then press the PAUSE button on the unit or the VTR
button on the camera to start recording. When you start
recording an image from a source other than an
external camera, press the PLAY button while holding
this button down. The indicator flashes and recording
starts. If you press only this button when the unit is in
the stop mode, the REC indicator lights and you can
check the EE signals for image, sound and time code.
After checking them, press the STOP button.
For details, see “DISPLAY SET menu” on page 84 (GB).
For details on time code, see “DSR-50/50P time codes” on
page 62 (GB).
Notes
• The unit cannot record images unless video signals
are input.
• If the video signals are interrupted during recording,
the unit is set to recording pause mode. When the
video signals are input again, recording is resumed.
That position of the tape where the recording resumes
may be distorted when the tape is played back.
• This unit cannot record in the LP mode of the
consumer DV format.
qa PAUSE button/indicator
Press this button to set the unit to pause mode while
recording, playing or audio dubbing. Pressing this
button again resumes the operation. The indicator
flashes when the unit is in pause mode.
Note
If you have started recording using an external camera
by pressing the VTR button on the camera, pressing
the PAUSE button while recording does not pause the
recording.
For details on how to record an image using an external
camera, see “Recording Using an External Camera” on
page 45 (GB).