


25
EN
Introduction Connections Basic Setup Playback
Editing
Others
Function Setup
Recording
This unit can receive the Hyper and Oscar
frequency bands.
• If “Skip” is set to “ON”, select “Skip” using
[U / D], then press [P]. Select “OFF” using
[U / D], then press [L].
• If you want to decode scrambled signals, select
“Decoder” using [U / D], then press [P ]. Select
“ON” using [U / D], then press [L].
• To store another channel, repeat steps 5 to 8.
9 After completion, press [SETUP] to
exit.
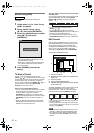
To Skip a Preset Channel
You can set the unit to skip channels you can no
longer receive or seldom watch when you access
channels using [PROG. / ].
1 Follow steps 1 to 4 in “Manual
Tuning (ANALOG)” on page 24.
2 Select “Position” using [U / D], then
press [P].
3 Select the position number you wish
to skip using [the Number buttons]
or [U / D], then press [L].
4 Select “Skip” using [U / D], then
press [P].
5 Select “ON” using [U / D], then
press [L].
• To skip another channel, repeat steps 2 to 5.
6 Press [SETUP] to exit.
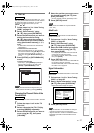
Move
You can replace two channels.
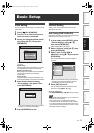
1 In stop mode, press [SETUP]. Select
“General Setting” using [U / D],
then press [ENTER/OK].
2 Select “Channel” using [U / D], then
press [ENTER/OK].
3 Select “ANALOG Channel Setup”
using [U / D], then press
[ENTER/OK].
4 Select “Move” using [U / D], then
press [ENTER/OK].
5 Select the position number of which
you want to change the channel
using [U / D], then press
[ENTER/OK].
You cannot select a position number where
“– – –” appears next to the number, because
“Skip” is set to “ON” for that position number.
6 Move the channel to another
position number using [U / D], then
press [ENTER/OK].
• To move another channel, repeat steps 4 to 6.
7 Press [SETUP] to exit.
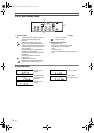
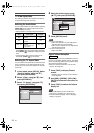
Auto Tuning (DVB)
You can programme the tuner to scan only the DVB
channels that you can receive in your area.
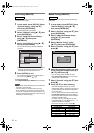
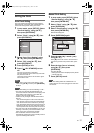
1 In stop mode, press [SETUP]. Select
“General Setting” using [U / D],
then press [ENTER/OK].
General Setting Menu will appear.
2 Select “Channel” using [U / D], then
press [ENTER/OK].
3 Select “DVB Channel Setup” using
[U / D], then press [ENTER/OK].
4 Select “Auto Tuning” using [U / D],
then press [ENTER/OK].
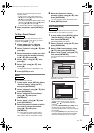
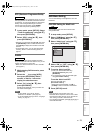
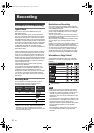
The unit will start storing channels available in
your area.
The tuner scans and memorise all the active DVB
channels in your area.
•Press [GREEN] after Auto Tuning is completed,
then the lowest memorised DVB channel
appears on the screen, and you can use
[PROG. / ] for the memorised DVB
channels.
• If you press [RETURN/BACK] or [RED] during
the scanning, the screen will return to the
previously displayed menu, and Auto Tuning will
be cancelled.
• If you press [SETUP] during the scanning, this
operation will stop and the lowest memorised
DVB channel will appear on the TV screen.
ANALOG
ANALOG
DVB
General Setting
Playback
Display
Video
Recording
Clock
Channel
DivX
HDMI
Reset All
Auto Tuning (DVB & ANALOG)
DVB Channel Setup
ANALOG Channel Setup
DVB Channel Setup
Edit Channels
Auto Tuning
Manual Tuning
Signal Information
CHANNEL SEARCH
CHANNEL 22 – 482 MHz
TV 13 RADIO 0
Channel1
Channel2
Channel3
Channel4
Channel5
Channel6
Channel7
Channel8
BACK
E7J70BD_EN.book Page 25 Monday, May 7, 2007 3:31 PM