


78-8130-6150-0 Rev G 57
2. Clamp the 3M
™
Dyna-Coupler around the cable or both the tip and ring of a pair.
Make sure the jaws fully close.
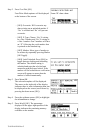
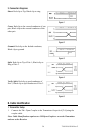
3. Press and hold off [T-1] to perform a battery check.
4. Press on: Ohm-meter/Fault Locate/Tone [T-2] three times to set the transmitter to
Tone mode.
− The indicator flag will light in the Digital Display [T-4] under the Tone icon.
5. Press Output Level [T-5] for high or maximum output power level.
− The indicator flag will light in the Digital Display [T-4] above the Output Level
icon when in high output power level and flash when in maximum output power
level.
− The Digital Display [T-4] will alternately flash between 577 and 200K.
2. Receiver Setup
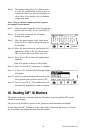
1. Press On/Off (Power) [1] to power the receiver on.
2. Press Locate/OK [5].
3. Press Tone/Ext [SK] to select Tone mode.
4. Connect a second coupler to the receiver’s External Jack [14] ([13] on 2250M)
using the Earth Contact Frame cable (4 ft. (1.2 m) cable) or another coupler cable.
5. Press Freq [SK Toggle] to select the highest transmitter frequency (200K).
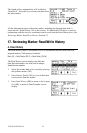
6. Check the first cable in the group by clamping the coupler around the cable. Make
sure the jaws fully close.
7. Press Gain [4] down and observe the numerical Signal Strength [10].
8. Remember the signal strength value and continue by clamping the coupler around
the next cable in the group.
− If the Signal Strength [10] is greater than the previous observation, press Gain
[4] down.
− If the Signal Strength [10] is less than before, ignore it.
− After checking all the cables in the group, the cable with the highest Signal
Strength [10] reading is the target cable.
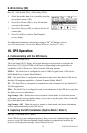
20. Help Mode
Menu [6] + >>More [SK:4] + Help [SK:8]
The help display contains basic information about the unit and its operation. It is
designed to be a quick reference guide.
• Press the double up/down arrows [SK] to navigate between sections.
− The single up/down arrows [SK] will scroll the display line by line.