


13-19
Cisco IOS Software Configuration Guide for Cisco Aironet Access Points
OL-29225-01
Chapter 13 Configuring RADIUS and TACACS+ Servers
Configuring and Enabling RADIUS
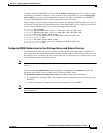
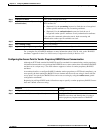
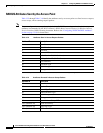
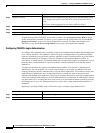
Beginning in privileged EXEC mode, follow these steps to specify WISPr RADIUS attributes on the
access point:
This example shows how to configure the WISPr location-name attribute:
ap# snmp-server location ACMEWISP,Gate_14_Terminal_C_of_Newark_Airport
This example shows how to configure the ISO and ITU location codes on the access point:
ap# dot11 location isocc us cc 1 ac 408
This example shows how the access point adds the SSID used by the client device and formats the
location-ID string:
isocc=us,cc=1,ac=408,network=ACMEWISP_NewarkAirport
Displaying the RADIUS Configuration
To display the RADIUS configuration, use the show running-config privileged EXEC command.
Note When DNS is configured on the access point, the show running-config command sometimes displays a
server’s IP address instead of its name.
Command Purpose
Step 1
configure terminal Enter global configuration mode.
Step 2
snmp-server location location Specify the WISPr location-name attribute. The
WISPr Best Current Practices for Wireless Internet
Service Provider (WISP) Roaming document
recommends that you enter the location name in this
format:
hotspot_operator_name,location
Step 3
dot11 location isocc ISO-country-code cc country-code
ac area-code
Specify ISO and ITU country and area codes that the
access point includes in accounting and
authentication requests.
• isocc ISO-country-code—specifies the ISO
country code that the access point includes in
RADIUS authentication and accounting requests
• cc country-code—specifies the ITU country code
that the access point includes in RADIUS
authentication and accounting requests
• ac area-code—specifies the ITU area code that
the access point includes in RADIUS
authentication and accounting requests
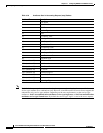
Step 4
end Return to privileged EXEC mode.
Step 5
show running-config Verify your settings.
Step 6
copy running-config startup-config (Optional) Save your entries in the configuration file.