


1. Ensure that you read the Safety instructions.
2. Follow the procedure listed in Before working inside your system.
3. Remove the SSD backplane.
4. Keep the Phillips #2 screwdriver ready.
Steps
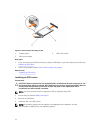
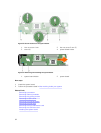
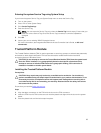
1. Align the screws on the SSD backplane with the screw holes on the SSD cage.
2. Press the SSD backplane into place until the retention screws on the SSD backplane engage with the
screw holes on the SSD cage.
3. Ensure that the backplane connector is seated firmly in the socket on the system board and tighten
the two captive screws to secure the backplane to the SSD cage.
Next steps
1. Install the SSD carriers into their original bays.
2. Follow the procedure listed in After working inside your system.
Related Links
Removing the SSD backplane
Installing an SSD carrier
NVRAM backup battery
The NVRAM backup battery installed in your system helps to retain the BIOS settings and configurations
even if the power is switched off.
Replacing the NVRAM backup battery
Prerequisites
WARNING: There is a danger of a new battery exploding if it is incorrectly installed. Replace the
battery only with the same or equivalent type recommended by the manufacturer. Discard used
batteries according to the manufacturer's instructions. See the safety instructions that came with
your system for additional information.
CAUTION: Many repairs may only be done by a certified service technician. You should only
perform troubleshooting and simple repairs as authorized in your product documentation, or as
directed by the online or telephone service and support team. Damage due to servicing that is
not authorized by Dell is not covered by your warranty. Read and follow the safety instructions
that came with the product.
1. Ensure that you read the Safety instructions.
2. Follow the procedure listed in Before working inside your system.
3. Remove the cooling shroud.
Steps
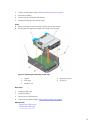
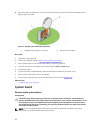
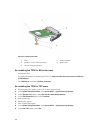
1. Locate the system battery.
2. Hold the battery and pull it toward the positive side of the battery till the battery disengages from the
connector.
3. Lift the battery up and away from the system.
4. To install a new system battery, hold the battery with the "+" sign facing the positive side of the
battery connector.
79