


RASFinder RF300E/RF310E User Guide
RF300E/RF310E24
CAUTION: WANs 1 and 2 correspond to BRI 1. B-Channel 1 of BRI 1 corresponds to WAN 1, and B-
Channel 2 of BRI 1 corresponds to WAN 2. The BRI line from the Telco has to be connected to the
corresponding port on the RASFinder (e.g., BRI Line 1 has to be connected to BRI 1 port on the back
of the RASFinder. The SPID and Directory Number (if used) for the BRI line assigned by the Telco
have to be entered on the ISDN Parameter Configuration dialog box for the corresponding WAN
number. WANs 1 and 2 are associated with BRI Line 1 and BRI 1 port on the back of the RASFinder.
Each of these entries has to correspond to the way the Telco provisioned the line, or else calls will not
go through.
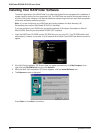
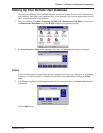
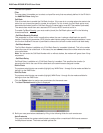
If the chosen switch type activates the Europe Parameters group, you may have to enter Data/Voice
ISDN and Sub Addresses associated with the WAN port displayed in the Config name window.
Enter the Data/Voice ISDN associated with the WAN port displayed in the Config name window.
The Data and Voice ISDN numbers can be up to 20 characters in length. The Data/Voice ISDNs are
assigned by your local phone company for the specific BRI line attached to the RASFinder. The BRI
line has to correspond to the BRI port on the back of the RASFinder and the B channel of that line
has to correspond to the WAN Port number; e.g., BRI Line 1 B-Channel 1 corresponds to WAN 1 and
BRI Line 1 B-Channel 2 corresponds to WAN 2.
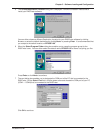
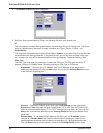
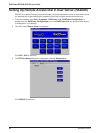
26 When you have finished entering the Parameter information for your WAN port, click OK and you are
returned to the WAN Port Setup dialog box; the ISDN TA Control group and the WAN number you
just configured will be highlighted.
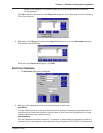
27 Highlight the next WAN port you want to configure, then click Edit. Repeat steps 22 and 26 for each
WAN port you need to configure.
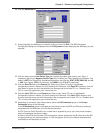
28 When all the necessary WAN ports are configured, click OK
twice to return to the Main menu.
29 At this time your RASFinder is operational.
If you want to assemble your Remote User Database, proceed to the next section.
If you want to setup your Radius, proceed to Setting Up RADIUS section.
If you are setting up your RASFinder for routing, proceed to the Final Routing Setup section.