


16
RQTV0134
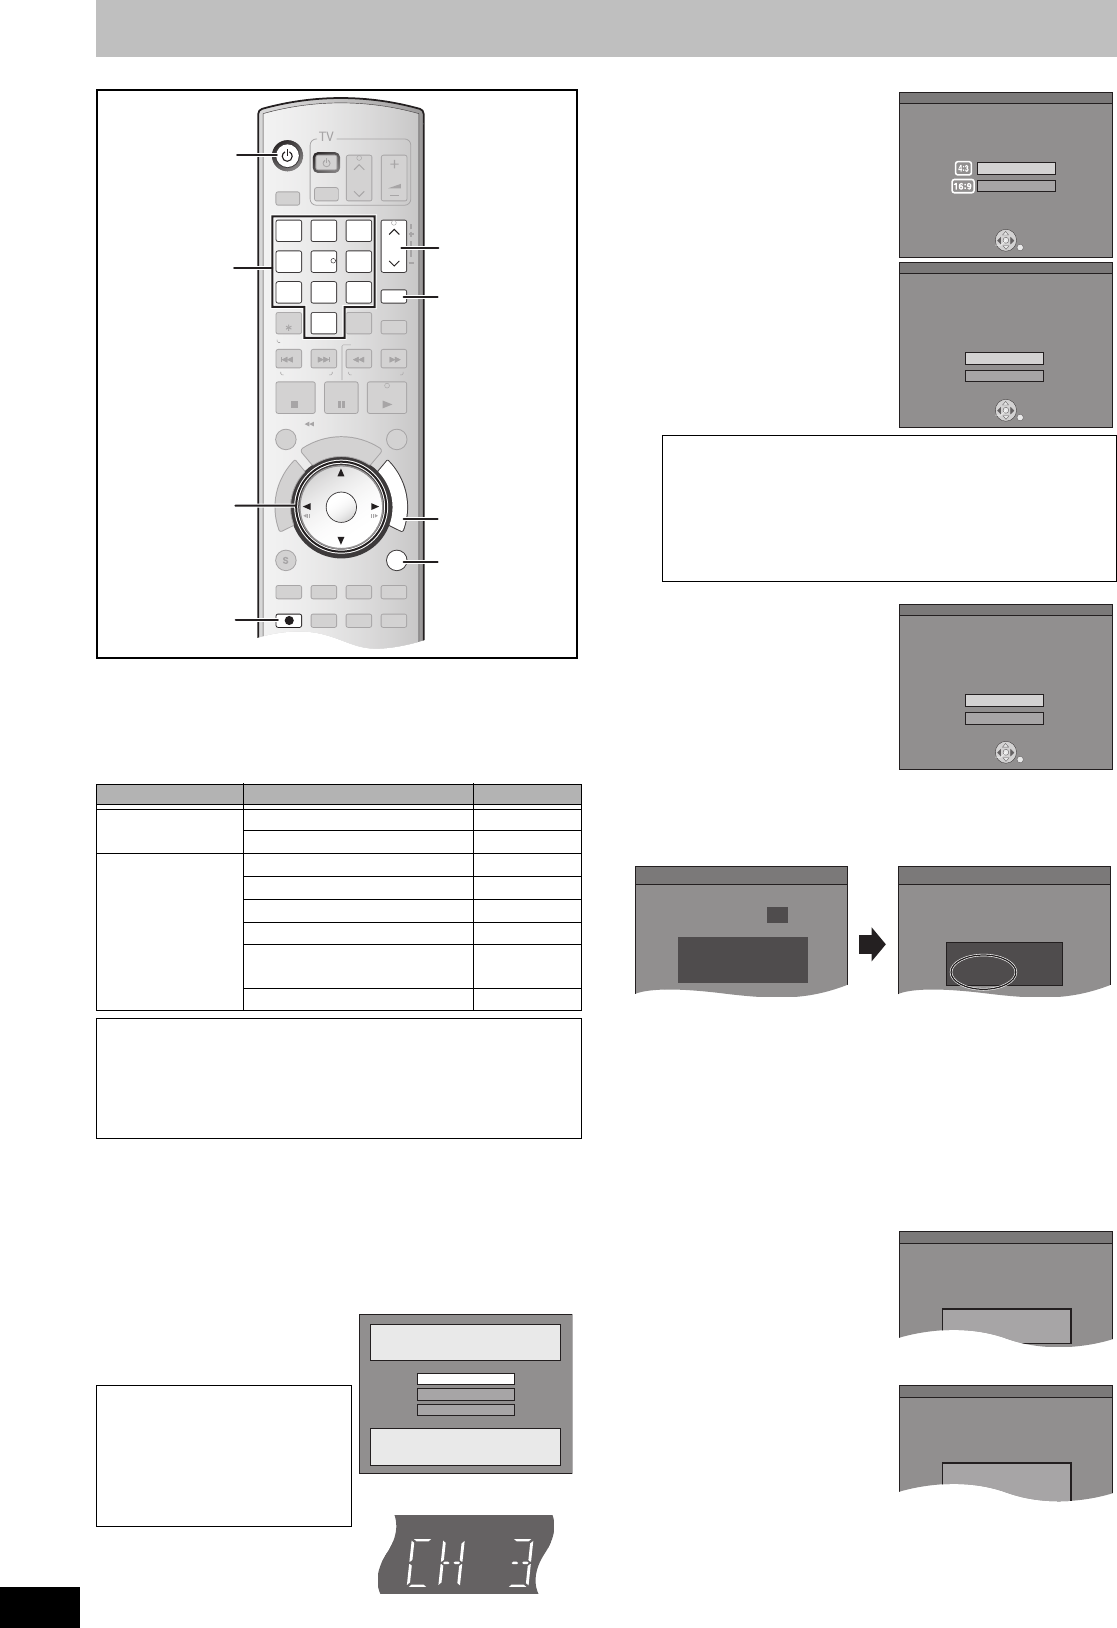
STEP 2 Plug-in Auto Tuning
After plugging the unit into your household AC outlet and pressing
[Í, DVD/VHS POWER] to turn the unit on for the first time, the unit
assists you to set the on-screen language, and automatically tunes
in all the channels it can receive and sets the clock.
The unit automatically determines the type of transmission (airwaves
or cable) and puts them into channels as follows.
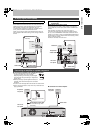
Preparation
≥Turn on the TV and select the appropriate video input to suit the
connections to the unit. (Example: AV input, CH3 or CH4)
≥If you connect the unit through a cable box or satellite receiver
(l 14), tune to your local PBS for Auto Clock Setting to work.
If there is no local PBS, set the clock manually (l 17, “Set Clock
Manually”).
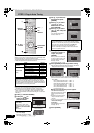
[1] Press [Í, DVD/VHS POWER].
[2] Press [CH, W, X] to
select an RF output
channel number.
The unit’s display
Each time you press the button:
CH 3 (Default setting) (# CH4 (# OFF
^-----------------------------------------------J
[3] Use [3, 4] to select the
language and press
[ENTER].
[4] Press [
3, 4] to select
“4:3 TV” or “16:9
Widescreen TV” and
press [ENTER].
[5] Press [
3, 4] to select
“On” or “Off” and press
[ENTER].
If you activate “Quick Start”
function, select “On”.
[6] Press [3, 4] to select
“Internal TV Tuner” or
“Input” and press
[ENTER].
When you do not set channels
on this unit, select “Input”. The
unit then displays “Set Clock
Manually” screen.
Set the clock manually. (l 17)
[7] Press [ENTER] to start Plug-in Auto Tuning.
≥The unit then proceeds with Auto Clock Setting. The time is
displayed when Auto Clock Setting is finished.
≥DST, Daylight Saving Time, shows the summertime setting.
≥Time Zone shows the time difference from Greenwich Mean
Time (GMT).
EST (Eastern Standard Time) l GMT j5
CST (Central Standard Time) l GMT j6
MST (Mountain Standard Time)l GMT j7
PST (Pacific Standard Time) l GMT j8
AST (Alaska Standard Time) l GMT j9
HST (Hawaii Standard Time) l GMT j10
For other areas: xx hr
∫When one of the following screens appears
“No channels were found.”
After turning off the unit, confirm
following and perform setup
again.
≥Confirm the antenna cable is
firmly connected to RF IN
terminal.
≥If you do not set channels on this unit, select “Input” in step 6.
“Auto Clock Setting is
incomplete.”
Press [ENTER] and set clock
manually. (l 17)
[8] Press [ENTER].
Band Channel
Antenna Mode
(Airwaves)
VHF 2 to 13
UHF 14 to 69
CableTV Mode
(Cable)
VHF 2 to 13
CATV LOW BAND 95 to 99
CATV MID/SUPER BAND 14 to 36
CATV HYPER BAND 37 to 65
ULTRA BAND
66 to 94
100 to 125
SPECIAL CATV CHANNEL 1
Regarding DST (Daylight Saving Time) (l 17)
Legal revision is expected to change the DST period in 2007.
When you use the unit with DST on, the change may cause the
unit’s clock to go behind the actual time. Check the DST setting in
Set Clock manually in the Setup menu, set DST off and reset the
clock precisely if you are using this function.
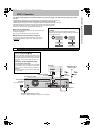
Connection (without Audio/
Video cable):
Select “CH3” or “CH4” which
displays the screen on the right.
Connection (with Audio/Video
cable):
Select “OFF”.
DVD/VHS
CHAPTER
CREATE
TV/VIDEO
RETURN
AB
S
C
H
E
D
U
L
E
DELETE
ADD/DLT
CH
ENTER
F
U
N
C
T
I
O
N
S
VOLUME
CH
CH
POWER
POWER
PLAY
PAU SESTOP
SKIP/
INDEX
SLOW/SEARCH
REW
FF
3
2
1
6
54
9
8
7
0
INPUT
SELECT
VCR/TV
F Rec
REC MODE
SUB MENU
CM SKIP
TIME SLIP
/
JET REW
D
I
R
E
C
T
N
A
V
I
G
A
T
O
R
DISPLAYAUDIO
REC
STATUS
TRACKING/V-LOCKTRACKING/V-LOCK
RESETRESET
CANCEL
DRIVE
SELECT
µ
Í
CH,
ADD/DLT
RETURN
FUNCTIONS
3, 4, 2, 1
ENTER
CH, W, X
Numeric
buttons
The unit’s display
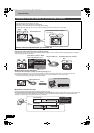
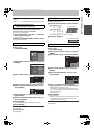
Select Language
Seleccione el idioma
Sélection de langue
Press ENTER
Pulse ENTER
Appuyer sur ENTER
English
Français
Español
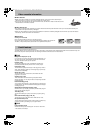
About “Quick Start” function
If you set Quick Start to on, you can start recording to DVD-
RAM about 1 second after you press [Í, DVD/VHS POWER]
to turn the unit on and then sequentially press [¥, REC].
The following happens when you have selected “On”.
≥Power consumption in standby mode increases because
power is supplied to the unit.
Select TV type and press ENTER.
(Please refer to Operation Instruction
for details.)
4:3 TV
16:9 Widescreen TV
ENTER
Aspect Ratio Selection
The unit can be turned on faster, in about
1 second. Please note that Quick Start
mode slightly increases power
consumption when the unit is off.
(See Operation instructions for details)
Turn Quick Start on ?
On
Off
ENTER
Quick start setting
Please select the source from which this
unit will record each time it is turned
on. Note: Selecting "Internal TV Tuner"
will start the Auto Channel Clock
Settings process.
This one time process takes a few minutes.
Internal TV Tuner
Input
ENTER
Default Recording Source
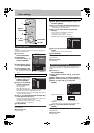
Set Channels Automatically
Ch.
Set Channels Automatically
Proceeding . . .
1 1 1
1
Set Clock Automatically
Auto Clock Setting is complete.
4/4/2007 12:15 AM
DST............. On
Time Zone.... CST
No channels were found.
Please check antenna or cable connection,
then...
Press ENTER again.
Set Channels Automatically
Auto Clock setting is incomplete.
Press ENTER
to set clock manually.
Set Clock Automatically
M6VP&PC.book 16 ページ 2006年2月6日 月曜日 午後3時20分