54 C2908M-B (4/05)
COMMAND REFERENCE
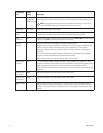
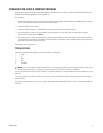
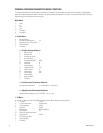
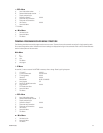
The following table gives an overview of the available commands.
Table B. Terminal Command Reference
Cmd Description
? This command redisplays (refreshes) the current menu.
1 Use this command to connect to the receiver in a box-to-box setup.
2 Use this command to sever this connection to the unit.
3 Use this command to sever all connections to the unit.
5 Use this command to join the stream of video from the NET300 transmitter. It establishes a physical box-to-box connection.
a (IP menu) Use this command to toggle auto-connect on/off. The default is off.
a (Video menu) Enter 0 (no) or 1 (yes) to indicate whether to adapt standard resolutions to NTSC (for example, CIF to NTSC).
c Use this command to display a list of physical network connections. This can be through Internet Explorer or a box-to-box connection.
d (Encoder transmitter menu only) This command returns the settings on this menu to factory defaults.
d (Receiver only) (RCP+ menu) Use this command to select to which decoder a connection to the encoder should be established.
D (Transmitter only) (RCP+ menu) Use this command to select to which decoder a connection to the encoder should be established.
e (Transmitter only.) Use this command to select the video you wish to configure or for which you wish to see information. Enter 1 or 2.
E (Receiver only) (RCP+ menu) Use this command to select to which encoder a connection to the decoder should be established.
g Use this command to enter a new gateway IP address. Type a new gateway address, and then press Enter.
h This command lets you set custom resolution (height: 128 to 240).
i (Encoder submenu) Use this command to change the size of the frames within the video stream.
i (IP menu) Use this command to enter a new IP address that PelcoNet will be using on the network. Type the new IP address, and then
press Enter.
k Use this command to set minimum frame distance.
l Use this command to show, and reset, the RTP packet loss statistics.
m Use this command to select the Ethernet link mode.
n Use this command to name the encoder presets. Type in the name and press Enter. (Name appears in Internet Explorer.)
p (Encoder submenu) Enter a number (1–8) that corresponds to a predefined profile. For example, 1 corresponds to “high quality (CIF).”
p (IP menu) Use this command to see if a unit can be reached. This pings the IP set in the ‘r’ menu (remote IP). The unit will respond if it
can be reached, or the ping command will time out if it cannot be reached.
q Use this command to adjust the value between frame quality and data rate. Enter a value between 1 and 31. Value 1 has highest I-
frame quality with a higher bandwidth while value 31 has lower quality and less bandwidth.
Q Use this command to adjust the value between video quality and the image frame rate. Enter a value between 1 and 31. Value 1 has
the highest quality with a lower video frame rate while value 31 is a maximum frame rate at lower quality.
r (Encoder submenu) Use this command to designate the data rate. Enter the data rate figure.
r (IP menu) Use this command to connect to a remote IP. Type the IP address, and then press Enter.
s (Encoder submenu) Enter a number to designate the frame resolution. Enter 2 for QCIF, 3 for CIF, or 6 for 2CIF.
s (IP menu) Use this command to enter a new subnet mask. Type the new subnet mask, and then press Enter.
u Use this command to set the I-frame update distance.
v Displays version information for the unit.
w This command lets you set custom resolution (width: 176 to 704).
x Exits this menu.


