


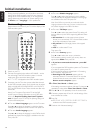

Advanced settings
You will be asked
– about the distances between the speakers and your
preferred listening position and
– to which input sockets on the DVD recorder system you
connected other appliances.
If you want to skip the advanced settings and to use
standard settings for the speaker distances and the
connections (see “Quick use guide”):
Press 4 to select NO, and continue with step 11 below.
If you want to continue with the advanced settings:
Press OK.
➜ SPEAKER DISTANCES is scrolled.
1 ➜ FRONT and 3,0M are displayed.
Press 3 or 4 repeatedly to set the distance of your
preferred listening position to the front speakers.
Then press OK to confirm.
2 ➜ CENTER and 3,0M are displayed.
Repeat step 1 for the centre speaker.
3 ➜ REAR and 1,5M are displayed.
Repeat step 1 for the rear speakers.
➜ SOURCE SETUP is scrolled.
4 ➜ DIGITAL AUDIO FROM TV? is scrolled.
Press 4 repeatedly to select
➜ NO if there is no digital audio connection between the TV
and the DVD recorder system,
➜ DIG if you connected the TV´s digital coaxial output to
DIGITAL IN on the DVD recorder system,
➜ OPT if you connected the TV´s digital optical output to
OPTICAL IN on the DVD recorder system.
Press OK to confirm.
5 ➜ VCR CONNECTED? is scrolled and YES is displayed.
If you did not connect a VCR to the DVD recorder
system:
Press 4 to select NO, then press OK.
If you connected a VCR:
Press OK.
➜ WHICH INPUT? is scrolled.
Press 4 repeatedly to select
➜ EXT2 if you connected the VCR to EXT 2 AUX I/O or
➜ EXT1 if you connected the VCR to EXT 1TO TV I/O on
the DVD recorder system.
Press OK to confirm.
➜ DIGITAL AUDIO? is scrolled.
Press 4 repeatedly to select
➜ NO if there is no digital audio connection between the
VCR and the DVD recorder system,
➜ DIG if you connected the digital coaxial output of the
VCR to DIGITAL IN on the DVD recorder system,
➜ OPT if you connected the digital optical output of the
VCR to OPTICAL IN on the DVD recorder system.
Press OK to confirm.
6 ➜ SAT CONNECTED? is scrolled and YES is displayed.
Repeat step 5 for a satellite receiver.
7 ➜ GAME CONNECTED? is scrolled and YES is displayed.
Repeat step 5 for a game console.
8 ➜ CD CONNECTED? is scrolled and YES is displayed.
If you did not connect a CD player to the DVD
recorder system:
Press 4 to select NO, then press OK.
If you connected a CD player:
Press OK.
➜ WHICH INPUT? is scrolled.
Press 4 repeatedly to select
➜ LIN1 or LIN2 if you connected the analogue audio
output of the CD player to LINE IN 1 or LINE IN 2 on
the DVD recorder system,
➜ DIG if you connected the digital coaxial output of the
CD player to DIGITAL IN on the DVD recorder system,
➜ OPT if you connected the digital optical output of the
CD player to OPTICAL IN on the DVD recorder
system.
Press OK to confirm.
9 ➜ CDR CONNECTED? is scrolled and YES is displayed.
Repeat step 8 for a CD recorder or similar.
10 ➜ TAPE CONNECTED? is scrolled and YES is displayed.
Repeat step 8 for a tape deck or similar.
➜ SOURCE SETUP COMPLETE is scrolled.
11 Press OK.
➜ AUTOINSTALL is displayed.The DVD recorder system
searches for available radio stations and stores them in its
memory.
➜ After the search INSTALLATION COMPLETE is
scrolled and a radio station is played.The DVD recorder
system is ready to play.
Initial installation
17
English