


3-18 C
HAPTER
3: I
NSTALLING
M
ODULES
I
NTO
T
HE
MSH C
HASSIS
DUA1800-0AAA04
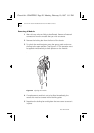
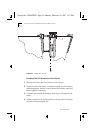
Installing/Removing A Module
1
Remove the locking bar from the front of the MSH chassis.
2
Ensure that the chassis is installed correctly and all
necessary cables are present. Prepare a slot to receive the module,
removing blanking plates if necessary.
3
Configure the module as necessary, referring to the relevant User
Guide.
4
Hold the module in the correct position; front panel facing
towards you.
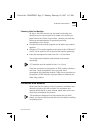
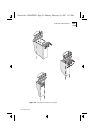
5
Raise the ejectors at the top and bottom of the module to the
open position (see Figure 3-4). Engage the module into the
runners at the top and bottom of the chassis and gently push it
into the chassis until the hook at the top of the ejector locates
under the edge of the chassis (see Figure 3-4). Ensure that the
ejector at the bottom of the module is in a similar position.
6
Simultaneously, press the ejector flaps at the top and foot of the
module firmly down into the closed position (Figure 3-4). Check
that the module has been fully pushed home by placing both your
thumbs on the module front panel and firmly pressing the
module home. Check that the module front panel is flush with
the chassis and other modules.
7
Reposition the locking bar and fully tighten the two screws to
secure it in place.
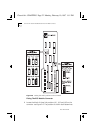
8
Connect network cables as necessary and check the operation of
the module.
If the module does not operate correctly or you need information
about connecting the network, please refer to the user guide that
accompanies the module
.
Chassis.bk : CHAPTER3 Page 18 Monday, February 10, 1997 1:11 PM