


3 – Turn-On Checkout
28
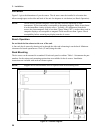
Checkout Procedure
Successful tests in this chapter provide a high degree of confidence that your unit is operating properly.
Complete performance tests are given in Appendix B.
NOTE: To perform the checkout procedure, you will need a computer with a GPIB interface.
You will also need a digital multimeter for making voltage and current measurements.
If you have not already done so, connect your unit to the computer's GPIB interface. Also connect the
power cord to the unit and plug it in.
Procedure Explanation
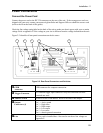
1. Connect the Hi sense terminal to the Hi
terminal. Connect the Lo sense terminal to
the Lo terminal. Connect the voltage inputs
of the voltmeter across the Hi and Lo sense
terminals of output 1.
The external voltmeter is used to verify the output.
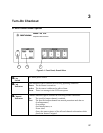
2. Turn the unit on. The unit undergoes a self-
test when you first turn it on.
During selftest, all indicators light simultaneously and then
light individually in a clockwise manner to test the
functionality of the display
3. Check that the fan is on. You should be able to hear the fan and feel air coming from
the back of the unit.
4.
Program
"Output On, (@1)"
Turn the output on.
5.
Program "
Voltage 10, (@1)"
Check the voltmeter display to verify the voltage
programming.
6. Create a variable for a measurement.
Program
"Measure:Voltage? (@1)"
Read the variable value.
Reads the voltage of output 1.
This should agree with the value displayed on the voltmeter.
7.
Program
"Voltage -10, (@1)"
Check the voltmeter display to verify the voltage
programming.
8.
Program
"Measure:Voltage? (@1)"
Read the variable value.
Reads the voltage of output 1.
This should agree with the value displayed on the voltmeter.
9.
Program
"Output Off, (@1)"
Turn the output off.
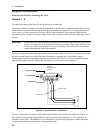
10. Connect the current measurement inputs of
the ammeter across Hi and Lo output
terminals of output 1. Observe polarity.
Use the ammeter to short the output of the unit and verify the
output current.
11.
Program
"Output On, (@1)"
Turn the output on.
12.
Program
"Function:Mode CURR, (@1)"
Program the unit for current priority mode.
13.
Program
"Current 0.0005, (@1)"
14. Create a variable for a measurement.
Program
"Measure:Current? (@1)"
Read the variable value.
Reads the current of output 1.
This should agree with the value displayed on the ammeter.
15.
Program
"Output Off, (@1)"
Disconnect the multimeter.
Turn the output off.
16. Repeat steps 3 through 15 for outputs 2, 3,
and 4.
Substitute the channel that you are programming after the @
symbol. For example, if you are programming channel 2,
program "(@2)" in all commands.