


Chapter 3 Configuring the System
80
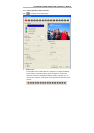
3 Enable Audio:
For NV1000/3000/5000 users, select an audio channel to map the video
channel if you want to monitor and record the audio of this appointed channel
with video. NV1000/3000/5000 system allows 4 audio channels. Users can
select ONE
desired channel and map it to the video channel that is monitoring.
A red triangle mark will be at the upper-left corner on each screen of the
channel. Cancel it if you don’t want to monitor and record audio. When you
connect to the Audio/ IO card, the function will be activated.
For NV 7000 users, click the box and the correct audio source if you want to
monitor and record the audio of the appointed channel.
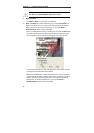
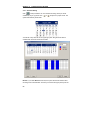
4 Motion Detection
You can drag the scroll box to adjust the motion detection sensitivity to your
desired scale. When it detects a motion, a green triangle mark appears at the
upper-left corner on each screen of the channels. The higher the value is, the
better the sensitivity the system can detect. The figure on the right side shows
the sensitivity scale.
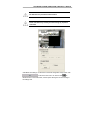
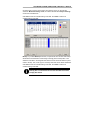
5 Quality
You can adjust the video quality by dragging the scroll box. The scale ranges
from 0 to 100. The higher the value is, the better the video quality becomes.
The right figure shows the current quality scale.
The file size of quality 100 will be larger, and it will shorten the
recording time.
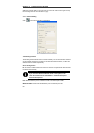
6 Frame Rate
This sets the number of images per second of video that is recorded. You can
adjust the video frame rate to your desired rate by dragging the scroll box. The
frame rate ranges from 1 to 30 (For NTSC, it is 1-30;For PAL, it is 1-25). The
higher frame rate, the larger the recorded files.
The max frame rate will vary from different product configuration.
7 Video Size
For NV 1000/3000/5000 users, the system provides 3 sizes for selection: 320 ×
240, 640 × 480, 640 × 480 (enhanced). Though the default system camera
setting is resolution 320x240, the system supports up to 16 cameras of