


Brocade BigIron RX Series Hardware Installation Guide 31
53-1002483-03
Installing a BigIron RX-4 switch
2
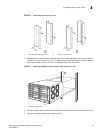
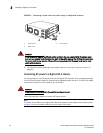
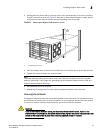
CAUTION
Carefully follow the mechanical guides on each side of the power supply slot and make sure the
power supply is properly inserted in the guides. Never insert the power supply upside down.
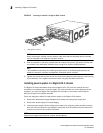
FIGURE 19 Installing a power supply in a BigIron RX-4 chassis
4. After the power supply is fully inserted, push the power supply front panel toward the back of
the chassis. This action causes the power supply connector to seat into the backplane
connector.
5. Push the ejectors in until they are flush with the face of the power supply. This action will fully
latch the power supply in the backplane.
6. Tighten the two screws at either end of the power supply front panel by pushing them in and
turning them clockwise. If desired, tighten the screws further using the flat-head screwdriver.
7. For information about connecting power to the chassis, refer to “Connecting AC power to a
BigIron RX-4 chassis” on page 31 or “Connecting DC power to a BigIron RX-4 chassis” on
page 32.
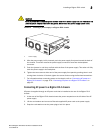
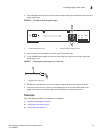
Connecting AC power to a BigIron RX-4 chassis
AC power is supplied through an AC power cord that is installed at the rear of the BigIron RX-4
chassis.
1. At the rear of the BigIron RX-4 chassis locate the power receptacle on the left side of the AC
power supply.
2. Lift the cord-retainer and connect a Brocade-supplied AC power cord to the power supply.
3. Snap the cord-retainer over the power plug to hold it in place.
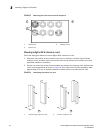
1 Power supply
1