50 Brocade BigIron RX Series Hardware Installation Guide
53-1002483-03
Installing a BigIron RX-16 switch
2
Populating a BigIron RX-16 chassis
The sequence for installing more than one card is important to ensure proper fit in the BigIron
RX-16 chassis. Always fill the bottom slots in the BigIron RX-16 first. Begin by filling the slots from
the left side of the chassis, and working your way towards the right. Refer to “BigIron RX-16
chassis” on page 4 for slot locations.
NOTE
Any empty slots must contain slot blanks to ensure proper air flow within the chassis.
Rules for populating a BigIron RX-16 chassis
1. Install a management module in management slot 2.
2. Install interface modules in interface slots 2, 4, 6, and 8.
3. Install switch fabric modules in the switch fabric slots 2 and 4.
4. Install interface modules in interface slots 10, 12, 14, and 16.
5. Install a management module in management slot 1.
6. Install interface modules in interface slots 1, 3, 5, and 7.
7. Install switch fabric modules in the switch fabric slots 1 and 3.
8. Install interface modules in interface slots 9, 11, 13, and 15.
Installing power supplies in a BigIron RX-16 chassis
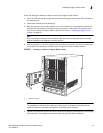
Follow the steps given below to install a power supply in a BigIron RX-16 chassis.
1. Remove the blank power supply faceplate, and expose the empty power supply slot.
2. Remove the power supply from its packaging.
3. Insert the power supply into the empty power supply slot, using the guides provided on either
side of the slot.


