


Page 17 MNNCEKRKB1_0439
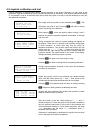
4.5.1 Default sett ing
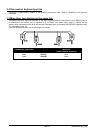
The default setting allows control of all cameras, erasing any previously defined setting.
To each camera is assigned a receiver identified by the same number (camera 1, receiver 1; camera 2, receiver
2, etc.) and all receivers are controlled by line A.
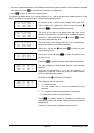
4.5.2 Accepted c ameras menu
The accepted cameras menu is used to determine which cameras can be recalled by the keyboard.
Select
to enter the submenu.
The four available items are:
•
: all cameras from 1 to 9999 are accepted.
•
: all cameras are disabled.
•
: a set of cameras is accepted. The number inserted first should be lower than the
second.
•
: a set of cameras is disabled. The number inserted first should be lower than the
second.
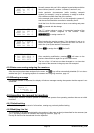
4.5.3 Assign rece ivers menu
The assign receivers menu defines which cameras have a receiver/dome.
Select to enter the submenu.
• The five available items are:
a receiver is assigned to every camera
•
all cameras are defined as “no pan & tilt”.
•
: receivers are assigned only if the corresponding camera is accepted; all
receivers for which the camera is disabled are removed.
•
: a set of receivers is assigned.The camera number inserted first should be lower than
the second.
•
:a set of receivers is disabled.The camera number inserted first should be lower than
the second.
Notes:
• The assigned receiver number corresponds to that of the corresponding camera without the thousands digit.
• When it is possible to choose between two different telemetry lines, insert the line on which the receivers are
connected. All receivers comprising an interval are assigned to the same telemetry line.
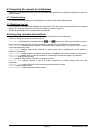
4.5.4 Modifying the list
After using the two previous menus for the overall definitions it is possible to modify individual items for a more
precise definition of the list of cameras that can be requested by the keyboard and of the receivers assigned to
them.
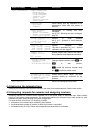
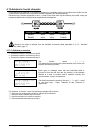
The modify list menu displays the various sets of cameras to be set up:
It is important to note the three special symbols on the right of the display:
indicates that no camera in the corresponding set is accepted
indicates that some cameras in the set are accepted and some are not
indicates that all cameras in the set are accepted.
There are 9999 cameras available: normally a much smaller set of cameras will be used but the possibility of
selection over a wide interval is useful for video management with large sized devices where the “zone” feature
is available.
The display in the example shows three sets of cameras: the first from number 1 to number 1000; the second
from number 1001 to 2000, the third from 2001 to 3000.
The other groups of cameras can be selected by moving the joystick
.
The cursor
shows the set of cameras being set up:
• to accept the request for all the cameras in the set press
.
• to disable all the cameras in the set press
.