


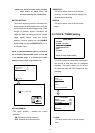


38
clearing out the data. Enter the standard
password “9999” if you haven’t set your own
individual password. To set your individual
password, please refer to section 4.6 System
Setting - PASSWORD option.
HD 1 / 2: Clears out all the data stored in HD
1 and HD 2.
BACKUP HD: Clears out all the data stored
in HD 2, which is set to backup
purpose only. (This function has to be
proceeded with when the HD 2
USAGE option is set to BACKUP.)
NOTE: In the case of the CD-RW model, only
one HD can be reformatted. No
backup HD can be used.
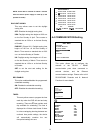
HD2 USAGE:
This option determines the way to utilize the
hard-disk drive in the mobile compartment.
REC
: Used for the regular recording
hard-disk drives.
BACKUP: Used for data backup only, which
will not be part of regular recording
hard-disk drive.
ALARM MIRROR : The mirror function serves
HD1. As HD1 records alarm data, that
data is simultaneously written to HD2.
NOTE: In the case of the CD-RW model, no
backup HD can be used. So you won’t
see that item mentioned in the menu.
HD BACKUP:
This function allows you to duplicate data
from HD 1 to HD 2. Please set HD 2 as
BACKUP first. (For operation details, please
refer to section 3.5)
FULL: Duplicates all the recorded video from
HD1 to HD2.
ALARM: Duplicates all the alarm-event
recorded video from HD 1 to HD2
SELECT: Duplicates a particular recorded
video from HD1 to HD2.
NOTE: In the case of the CD-RW model, no
backup HD can be used. So you won’t
see that item mentioned in the menu.
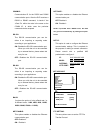
HD FAT32:
This function builds the FAT32 file system a
the hard-disk, enabling the data in it to be
played back on the PC.
SD FILE:
This option determines the format to save the
important image files in an SD card.
JPEG: Archives images in the JPEG format
to save a single picture in every file.
AVI: Archives images in the AVI format to
save a sequence of images in a file, the
maximum limit being 300 images for
every file. You can stop recording
whenever you want, and if you don’t,
recording will automatically stop at the
optimum of
300 images.
NOTE: In the case of the CD-RW model you
won’t see the “SD FILE” item
mentioned in the menu, because it’s
not used here.
NOTE: To save images or videos in a
CD-ROM or SD Card, please refer to
section 3.5 for more details.
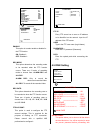
AUTO ERASE:
This item offers you two options.
OFF: Choosing this alternative disables the
"AUTO ERASE" function.
SET: This choice enables the "AUTO ERASE"
function. Select "SET" and press the
ENTER button to enter the "AUTO
ERASE SETTING" page, where you can
enable the settings to save data for
storage for any period of time from 1 to
365 days. After the expiry of the time
period you set, the data will be erased
automatically. This process of storage and
erasure over the time period you set will
be repeated indefinitely until you disable
the settings or change the settings to a
different time period.
SD REFORMAT:
This option allows you to clear out all the data
in the SD card.
CD REFORMAT:
This option allows you to clear out all the data
in the CD-ROM.
NOTE: In the case of the model with the
removable HDD you won’t see the
“CD REFORMAT” item mentioned in
the menu, because this model
doesn’t have a CD-ROM unit.