


Chapter 2. TV Connections 23
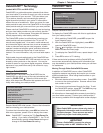
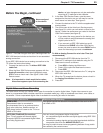
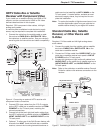
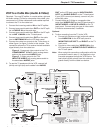
Name assigned
to the device
Figure 3. The ClearThought Auto Input Sensing screen for
IEEE 1394 devices includes a check box for an associated
analog connection.
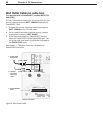
IfyourIEEE1394devicehasananalogconnectiontothe
TV,followtheinstructionsbelow.
1. ConnectthedevicetotheTVwith an IEEE 1394
cable first.
2. WhentheNew1394Devicescreenappearswiththe
Analog Connectioncheckboxhighlighted,press
ENTER
toenteracheckmark.Seefigure3,New1394
Devicescreen.
Note: It is important to check mark the box when
this screen appears upon first connecting the
Digital Video and Home Recording
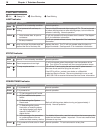
Thetablebelowwillhelpyoudecidewhichtypeofconnectiontousefordigitalvideo.Digitalvideocomestoyour
homeinacompressedstate,whetherreceivedonrecordedmedia(e.g.,disc)orbroadcastovertheair,overcable,or
viasatellite.Somecompresseddigitalvideoisavailableforrecordingasnotedinthetable.
Connection Type into the TV
Effect on Home Recording
HDMI or DVI
Compressedvideoisconvertedto
uncompressedformbyanexternaldevice
suchasacablebox,satellitereceiver,or
DVDplayerbeforeitissenttotheTVonan
HDMIorDVIcable.
YoucannotrecordtheresultantuncompressedvideosenttotheTV
viaHDMIorDVI.
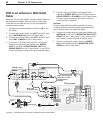
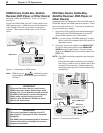
IEEE 1394 (FireWire®) Connections
YourTVcanreceiveanddecodedigital
channels,MPEG2compresseddigitalvideo,
andDolbyDigitalaudio.
Youcanrecordcompresseddigitalvideoeither
• oncompatibledigitalrecordersasdigitalsignalsusingIEEE1394
connections
• convertedtoanalogsignalsandrecordedasstandard-definition
compositevideofromthe
MONITOR OUT
jack
Youmaybeunabletorecordsomeprogrammingbecauseofcopyrestric-
tionsaddedbythecontentowners.
device,aslaterchangescanonlybemadeafter
returningallTVsettingstotheirdefaults.
3. IntheNew1394Devicescreen,notethename
assignedtothedevice,asyouwillneedtousethe
samenameinalaterstep.Seefigure3.
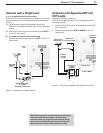
4. ConnectthedevicetotheTVwiththesupplemental
analogcables.
5. ThenextscreenistheAutoInputSensingscreen
(seefigure2)inwhichyoucanselectanameforthe
device.SelectthesamenameyounotedintheNew
1394Devicescreen(seefigure3).
• Ifyouselectthewrongnameforthedevice,you
willbeunabletoswitchbetweentheanalogand
digitalinputstotheTV.
• IfyouconnectanIEEE1394cableboxandit
isdetectedasCABLEintheNew1394Device
screen,besuretoselectthenameCABLE asthe
namefortheanaloginputand notcablebox.
To Add an Analog Connection at a Later Time (not
recommended)
1. DisconnecttheIEEE1394devicefromtheTV.
2. ResetallTVsettingstotheirdefaultsusingtheTV
Resetservicemenuasfollows:
a. Press
MENU
todisplaytheMainmenu.
b. Press
1 2 3
toopentheResetservicemenu.
c. Press
ENTER
.
3. ReconnecttheIEEE1394devicetotheTV,usingthe
IEEE1394cablefirst.
4. WhentheTVrecognizesthedevice,placeacheckin
theAnalog Connectioncheckbox.
5. Press
EXIT
.
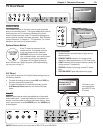
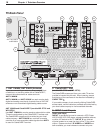
Before You Begin, continued