SAVING (COPYING) RECORDED IMAGES
Copying to a DDS (DAT) drive
1
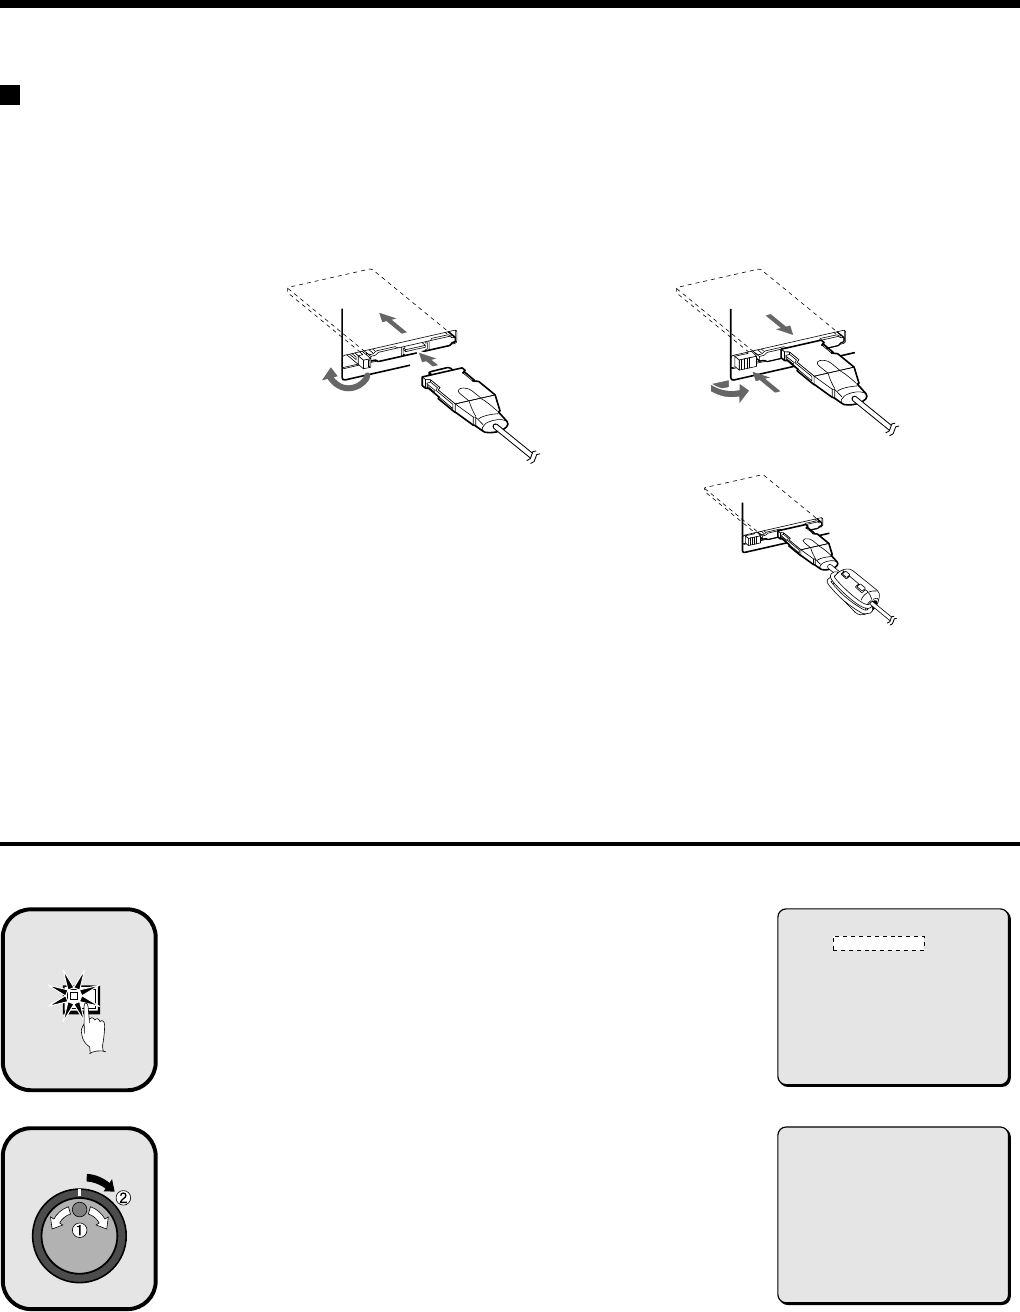
Insert an SCSI card (sold separately) for connecting the
DDS (DAT) drive into the PC card slot at the rear of the
digital video recorder.
Images from the archive area can be copied to the DDS (DAT) drive, and
images recorded on the DDS (DAT) drive can also be copied to the archive
area.
Note:
•
Check that the direction of insertion is correct wehn inserting the SCSI card.
•
If an SCSI card or DDS (DAT) drive other than the ones recommended is
used, correct operation cannot be guaranteed.
•
DDS (Digital Data Strage)/DAT (Digital Audio Tape).
Backing up
All of the data in the archive area can be backed up on a DDS (DAT) drive.
Press the COPY button during recording or when the
digital video recorder is stopped.
The ARCHIVE SET screen appears.
Use the jog dial to select BACK UP and then turn the
shuttle dial clockwise.
“ARCHIVING TO DDS(DAT) !” appears, and copying then starts.
•
If you press the COPY button while copying is in progress, copying is
canceled.
•
When copying is completed, “ARCHIVE FINISHED!” appears. Press any
button to return to the normal screen.
Note:
•
When data is converted for storage on a DDS (DAT) drive, the conversion
process may result in an increase in the size of the data. If copying
images onto a 12 GB tape, it may only be possible to copy about 10 GB of
data.
•
It will take approximately 4 hours to copy 10 GB of data onto a DDS (DAT)
drive.
1
1
2
3
2
3
(Installed)
(Removed)
You can slide the
knob to lock the
card.
Return the knob
after unlocking.
• Recommended SCSI card
Manufacturer: ADAPTEC
Model No.: Slim SCSI 1460
• Recommended DDS-3 type DDS (DAT) drive
Manufacturer: Hewlett Packard
Model No.: Super Store dat 24e
Be sure to attach the accessory ferrite core
to the SCSI card connection cable.
COPY
2
<ARCHIVE SET>
BACK UP ->
RESTORE ->
ERASE ->
3
01-01-01
00:00:00 EN 0.12SEC
ARCHIVING TO DDS(DAT) !
<PRESS COPY TO ABORT>
English
35
