


11
EN
Introduction Connections Basic Setup Playback
Editing
VCR Functions Others
Function Setup
Recording
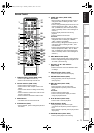
Functional Overview
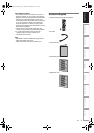
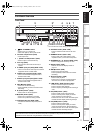
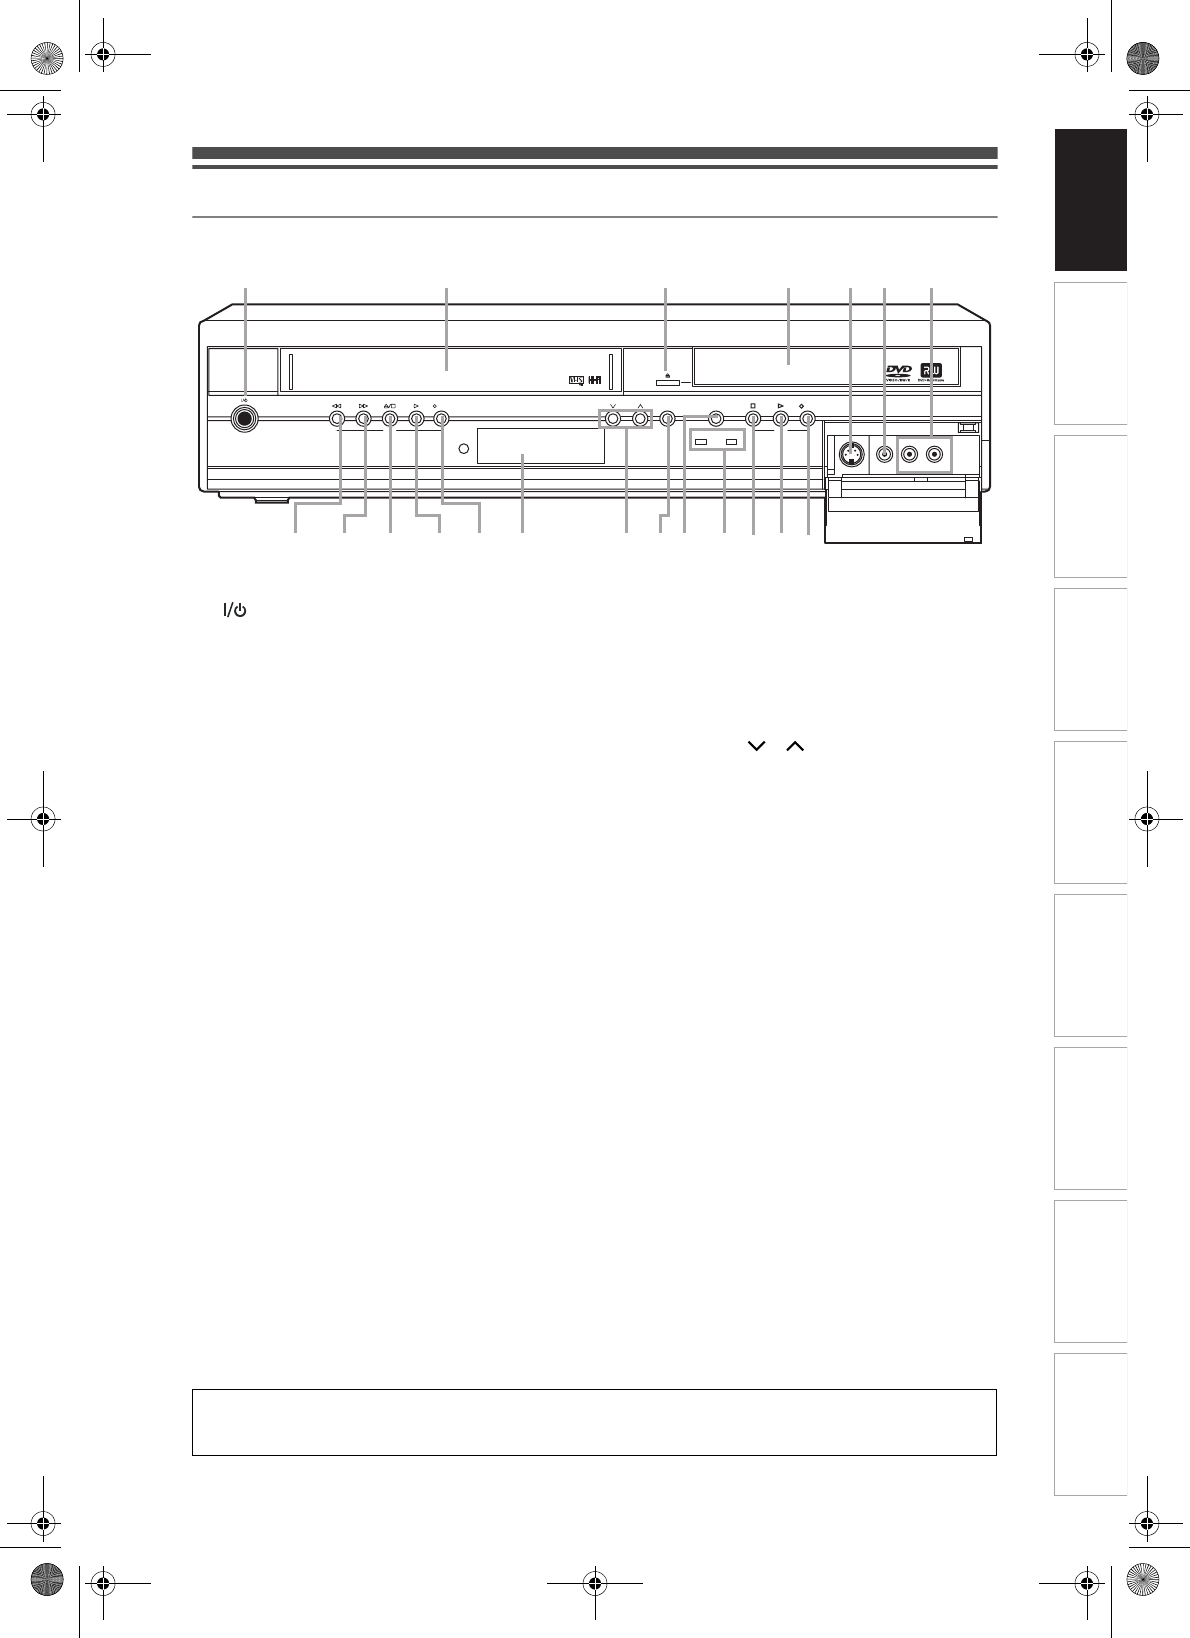
Front Panel
1 ON / STANDBY button
• Press to turn on or off the unit.
• Green LED lights up when power is ON.
2 Cassette compartment (VCR)
• Insert a tape here.
3 O (OPEN / CLOSE) button* (DVD)
• Press to open or close the disc tray.
4 Disc tray (DVD)
• Place the disc here when the disc tray is
opened.
5 S-VIDEO input jack (AV3) (DVD / VCR)
• Use to connect the S-Video output of external
equipment with an S-Video cable.
6 VIDEO input jack (AV3) (DVD / VCR)
• Use to connect external equipment with a
standard Video cable.
7 AUDIO input jacks (AV3) (DVD / VCR)
• Use to connect external equipment with a
standard Audio cable.
8REC I button (DVD)
• Press once to start recording.
• Press repeatedly to start a One-touch Timer
Recording.
9 P (PLAY) button* (DVD)
• Press to start or resume playback.
10 S (STOP) button (DVD)
• Press to stop a playback or recording.
• Press to stop a timer recording of DVD.
11 VCR/DVD indicator (DVD / VCR)
• Indicates the selected component (DVD or
VCR).
12 VCR/DVD button (DVD / VCR)
• Press to select the DVD mode or the VCR
mode.
13 DUBBING button (DVD / VCR)
• Press to start VCR to DVD (DVD to VCR)
duplication which you set in the Setup menu.
14 PROGRAM / buttons (DVD / VCR)
• Press to change the channel up or down.
15 Display (DVD / VCR)
• Refer to “Front Panel Display Guide” on
page 18.
16 REC I button (VCR)
• Press once to start recording.
• Press repeatedly to start a One-touch Timer
Recording.
17 P (PLAY) button* (VCR)
• Press to start playback.
• Press to turn on the unit and start playback
when the unit is off with a tape playback.
18 O/S (STOP / EJECT) button (VCR)
• Press to remove the tape from the unit.
• Press to stop the tape playback.
• Press to stop the proceeding timer recording in
VCR.
19 f (FWD) button* (VCR)
• Press to rapidly advance the video tape.
• Press to view the picture rapidly in forward
during playback. (Forward Search)
• Press to turn the unit on when the video tape is
inserted and start rapidly advancing the tape.
20 r (REW) button* (VCR)
• Press to rewind the video tape.
• Press to view the picture rapidly in reverse
during the playback mode. (Rewind Search)
• Press to turn the unit on when the video tape is
inserted and start rewinding the tape.
ON / STANDBY
VCR
REC DUBBING
PROGRAM
VCR/DVD REC
DVD
DVDVCR
LRS-VIDEO VIDEOAV3
18 15 1419*20* 1617* 1312 9*10 8
1 23*456
11
7
(
*
)
You can also turn on the unit by pressing these buttons.
Button names described in the Owner’s Manual
The instructions in this manual are described mainly with the operations using the remote control. Some
operations can be carried out using the buttons on the front panel.
E9GA0BD_EN.book Page 11 Monday, March 26, 2007 10:14 AM