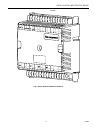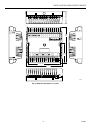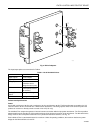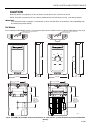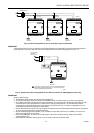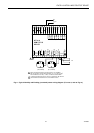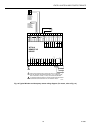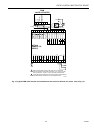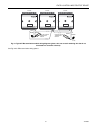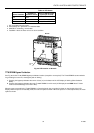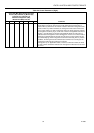
EXCEL 10 W7761A INPUT/OUTPUT DEVICE
40 74-2699
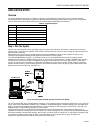
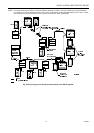
This procedure will use switching logic to add the pseudo analog point. With the RIO plant having the focus, go into
switching logic. Select the
Software Points
menu item and then
Pseudo Analog
. The
Create/Select Software Point
<
Va
>
dialog box will be displayed. Type in a New point name for the enthalpy sensor (such as
OaEnthaply
) and click on the
OK
button. The new point that was just created will be added to the screen as the header point for switching logic table and
also added to the
Point List
. Select the
Cancel
button to exit the
Create/Select Software Point
<
Va
> dialog box. Exit
switching logic by selecting the
File
menu item and
Exit
. CARE will display the
Delete Unused Software Points
list box.
Click the
Cancel
button to continue.
2.
Go into the
Data Point Editor
(
Controller/Edit/Data Point Editor
) and under
Point
select the pseudo analog point that was
just created and click the
OK
button. Select the drop down list for the
Engineering Unit
and scroll through the list until the
mA (mA matches the engineering unit of the RIO input) engineering units are displayed. Select the mA engineering unit
that is shown with one decimal place (number 66) and click the
OK
button to save the selection. Cancel the
User
Address
list box and select
File/Exit
to exit out of the Data Point Editor.
3.
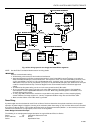
Translate the Zone Manager and Export the Zone Manager files to E-Vision by selecting the
Project
and
Export to E-
Vision
menu items. Type in the name of the Zone Manager Export file when the
Export Zone Manager
dialog box is
displayed. Select the project and the Zone manager within that project that is being exported and click the
Export
button.
Exit CARE and Start E-Vision. Select the E-Vision project to open and the CARE Export Filename created above. Once
the project is open, select the RIO device that the enthalpy sensor is connected to and go into the
Application Selection
screen (offline) by selecting the
Controller
, then the
Application Selection
menu items. From the
Inputs
tab of the
Application Selection
dialog box, add Oa_Enthalpy to either analog input 5 or 6 and select the
OK
button to save the
selection.
4.
Select the
Controller
menu item and then
Import
from CARE to import the Zone Manager files with the new pseudo
analog point. If this function has already been performed before, the user will be prompted with the message CARE
Export File has already been imported, do you want to import again?. Select
Yes
to continue with the Import. When the
import is finished, E-Vision displays the message CARE Export File has been imported. Select
OK
to continue.
5.
Select the
Network
menu item and then
Map C-Bus Points
. Select
RIO1
as the Controller Type from the
Map C-Bus
Points
dialog box. Under
Unmapped CARE
, select the name of the RIO device that the enthalpy sensor was added to in
CARE. Under
Unmapped Excel 10
, select the name of the RIO device that the actual enthalpy sensor was added to
(both names should be the same). Next, select the
Custom
button and the
Custom Mapping CARE Points
dialog box will
be displayed. Select the
OaEnthalpy
point under
CARE Points
and
CurrentAI
under
Excel 10
. CurrentAI is the user
address in the RIO device that contains the actual sensor value for the OaEnthalpy (C7400A1004, 4 to 20 mA device).
Select the
Map
button to add the OaEnthalpy point to the list of
Mapped Points
. Click on the
Close
button to exit the
Custom Mapping CARE Points
dialog box. Click on the
Close
button to exit the
Map C-Bus Points
dialog box.
6.
To use the OaEnthalpy custom mapped point with other Excel 10 controllers on the E-Bus, select the
Network
menu item
and
Refer Excel 10 Points
. Select the RIO device name as the
Source Excel 10
and then scroll down the list of
Excel 10
Points
: until you reach
CurrentAI
and select it. Select an Excel 10 controller from the
Destination Excel 10
list. For
example if the user had selected a CVAHU controller from the
Destination Excel 10
list, the user would select from the
Excel 10 Points
list as the destination point and then click on the
Add
button to add the point association (Binding)
between the RIO and CVAHU controllers. If
DestOaEnth
is already being used in an association, then the message
At
Least
one of the output network variables is in an existing connection and E-Vision will not allow this association to be
added. In order to add this association, the user has to remove any other associations with the
DestOaEnth
point. Select
the
Close
button to exit out of the
Refer Excel 10 Points
dialog box. Any controllers involved in the new association or
change in an existing association will require commissioning.
7.
Select the
Controller
menu item and the
Update Zone Manager Files
. E-Vision will add the custom mapping information
to the Zone Manager files. When the
Update Zone Manager Files
function is done, commission any controllers that need
to be commissioned, then close the E-Vision project and exit out of E-Vision.
8.
Start CARE and open the Zone Manager that was just updated through the
Update Zone Manager Files
function and
start XI584 by selecting the
Controller
,
Tools
and
XI584
menu items. Once XI584 is started, select the
Utilities
and
File
Transfer
menu items and select
CARE Import
. Select the project and the Zone Manager that was just updated and select
Import
and click
OK
on the
Select Target Controller
dialog box. When the CARE Import is complete, close the
CARE
Import
dialog box. If this is the initial loading of the Zone Manager, then it will have to be reset and the CPU address set
by the XI581 Emulation function (
Applications
,
XI581 Emulation
menu). Select the
Utilities
,
File Transfer
menu items and
select
Download
. The
Download
dialog box will be displayed. Check the
All
selection and click the
Controller
button.
When the
Select Controller/Subsystem
dialog box is displayed, make sure that the correct CPU address or name is high
lighted and select the
OK
button. Click the
Download
button and click
Yes
to the message
Replace
updated application
part in controller (CPU address or Controller name). When the download is complete, exit out of the
Download
dialog
box. From the XI584 main menu, select the
Data
,
Access by User Address
menu items. Type
OaEnthalpy
in the
Search
For User Address
and click the
Search
button. When the
OaEnthalpy
point displays in the
User Addresses
list, click on
the point and select the
Attributes
button. XI584 will now display the value of the enthalpy sensor connected to the RIO
device. This point can now be used in the Zone Manager control strategy or switching logic. This point can be used in
other Excel 5000 (C-Bus) controllers by assigning a global analog point in the destination controller with the user address
name of
OaEnthalpy
. Refer to the CARE User’s Manual form, 74-5587 for information on creating global points in Excel
5000 controllers.
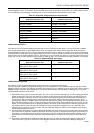
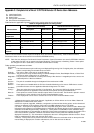
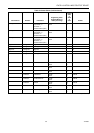
ADDING OTHER VOLTAGE/CURRENT SENSORS
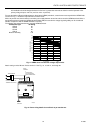
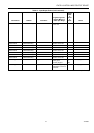
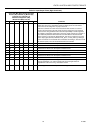
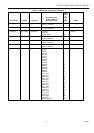
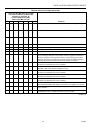
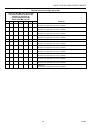
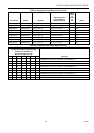
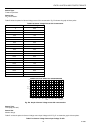
See Table A-1 for the supported Voltage/Current analog input sensors that can be connected to the RIO Device. The user
must add a software point (pseudo analog - in RIO CARE Plant) that can be mapped to the actual hardware input (RIO Plant)
through the Custom Mapping function of E-Vision. The procedure described previously for adding an enthalpy ( 4 to 20 mA)
sensor should be followed and instructs the user on adding the pseudo analog point in the RIO CARE Plant and using the