


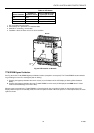


EXCEL 10 W7761A INPUT/OUTPUT DEVICE
42 74-2699
displayed. Select the project and the Zone manager within that project that is being exported and the
Export
button. Exit
CARE and Start E-Vision. Select the E-Vision project to open and the CARE Export Filename created previously. Once
the project is open, select the RIO device that the Digital Output is connected to and go into the
Application Selection
screen (offline) by selecting the
Controller
,
Application Selection
menu items. From the
Outputs
tab of the
Application
Selection
dialog box, select the first Unused_DigOutput and scroll up until
Discrete1
is displayed and select it. Select the
OK
button to save the selection.
4.
Select the
Controller
menu item and then
Import
from CARE to import the Zone Manager files with the new pseudo
analog point. If this function has already been performed before, the user will be prompted with the message
CARE
Export File
has already been imported, do you want to import again?. Select
Yes
to continue with the Import. When the
import is finished, E-Vision displays the message
CARE Export File
has been imported. Select
OK
to continue.
5.
Select the
Network
menu item and then
Map C-Bus Points
. Select
RIO1
as the Controller Type from the
Map C-Bus
Points
dialog box. Under
Unmapped CARE
, select the name of the RIO device that the Digital Output was added to in
CARE. Under
Unmapped Excel 10
, select the name of the RIO device that the actual Digital Output was added to (both
names should be the same). Next, select the
Custom
button and the
Custom Mapping CARE Points
dialog box will be
displayed. Select the
MiscExhFan
point under
CARE Points
and
DigOut1Cmd
under
Excel 10
. Select the
Map
button to
add the
MiscExhFan
point to the list of
Mapped Points
. Click on the
Close
button to exit the
Custom Mapping CARE
Points
dialog box. Click on the
Close
button to exit the
Map C-Bus Points
dialog box.
6.
Re-commission the RIO device that had the custom mapping done.
7.
Select the
Controller
menu item and the
Update Zone Manager Files
. E-Vision will add the custom mapping information
to the Zone Manager files. When the Update Zone Manager Files function is done, close the E-Vision project and exit out
of E-Vision.
8.
Start
CARE
and open the Zone Manager that was just updated through the
Update Zone Manager Files
function and
start XI584 by selecting the
Controller
,
Tools
and
XI584
menu items. Once XI584 is started, select the
Utilities
,
File
Transfer
menu items and select
CARE Import
. Select the project and the Zone Manager that was just updated and select
Import
and click
OK
on the
Select Target Controller
dialog box. When the CARE Import is complete, close the
CARE
Import
dialog box. If this is the initial loading of the Zone Manager, then it will have to be reset and the CPU address set
by the XI581 Emulation function (
Applications
,
XI581 Emulation
menu). Select the
Utilities
,
File Transfer
menu items and
select
Download
. The
Download
dialog box will be displayed. Check the
All
selection and click the
Controller
button.
When the
Select Controller/Subsystem
dialog box is displayed, make sure that the correct CPU address or name is
highlighted and select the
OK
button. Click the
Download
button and
Yes
to the message
Replace
updated application
part in controller (CPU address or Controller name). When the download is complete, exit out of the
Download
dialog
box. From the
XI584
main menu, select the
Data
,
Access by User Address
menu items. Type
MiscExhFan
in the
Search
For User Address
and click on the
Search
button. When the
MiscExhFan
point displays in the
User Addresses
list, click
on the point and select the
Attributes
button. XI584 will now display the value of the Digital Output connected to the RIO
device. To command the
MiscExhFan
to the
On
mode, put the point in the
Manual
mode and enter a value of
1.0 or
greater
. To command the
MiscExhFan
to the
Off
mode, put the point in the
Manual
mode and enter a value of
0.0
. This
point can now be used in the Zone Manager control strategy or switching logic and Time Programs. This point can be
used in other Excel 5000 controllers (C-Bus) by assigning a global analog point in the destination controller with the user
address name of MiscExhFan. Refer to the CARE User’s Manual form, 74-5587 for information on creating global points
in Excel 5000 controllers.
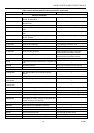
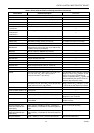
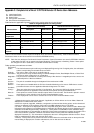
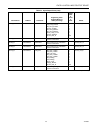
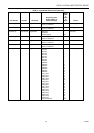
Table A-3. Supported Digital Output Types.
E-Vision Enumerated Name in the Output
Application Selection Tab
RIO Network Variable that contains the
Hardware Output Value
Float1_Open through Float8_Open (Series 60 -
requires two outputs assigned. Float1_Open
must be assigned before Float1_Close)
DigOut1Cmd through DigOut8Cmd
Float1_Close through Float8_Close (Series 60
- requires two outputs assigned. Float1_Open
must be assigned before Float1_Close)
DigOut1Cmd through DigOut8Cmd
Discrete1 through Discrete8 (Maintained On/Off
outputs)
DigOut1Cmd through DigOut8Cmd
Modulate1 through Modulate8 (PWM outputs) DigOut1Cmd through DigOut8Cmd
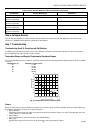
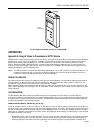
Appendix B. Sequences of Operation.
Common Operations
The Excel 10 W7761A Device contains inputs and outputs, but no control software. All control that would be associated with
the inputs and outputs in the W7761A would be accomplished though the Excel Zone Manager and would not be suitable for
VAV control, temperature control, or any control function that would require less than a 30 second update rate. The analog and
digital sensors could be shared or bound to other Excel 10 controllers on the E-Bus or Excel 5000 controllers on the C-Bus
through the Excel 10 Zone Manager. This would allow the other Excel 10 controllers to use their physical inputs for monitoring
other elements such as return humidity, IAQ, etc. to achieve better control.
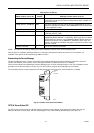
Room Temperature Sensor (RmTemp)