


50
50
EN
T
T
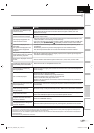
ROUBLESHOOTING
Troubleshooting Guide
g
If the unit does not perform properl
y
when operated as instructed in this manual,
check the following chart and all connections once before calling for service.
gg
Symptom Remedy
T
V
No power
•
M
ake sure the AC power cord is plu
gg
ed in.
•
M
ake sure that the AC outlet supplies the proper volta
g
e, plu
g
another electrical
a
pp
liance into the AC outlet.
• If a power failure occurs, unplu
g
the AC power cord for 1 minute to allow the unit
to
r
eset
i
tse
lf
.
Control button does not work.
•
Press on
l
y one
b
utton at a time. Do NOT press more t
h
an one
b
uttons at t
h
e same
t
i
me
.
Power is ON but no screen
image.
• Check whether the connection of the antenna
,
cable receiver or satellite box is
connected correctl
y
.
• Check whether all the cables to the unit are connected to the correct output
j
ac
k
of
y
our device like BD/DVD recorder.
•
M
ake sure that the selected input mode is connected to the working input
j
ack.
• Check if
y
our computer is NOT in sleep mode when the input mode of this unit is
in PC mode. Tap an
y
ke
y
on the ke
y
board to wake up
y
our computer
.
No picture or sound
•
Check i
f
the power is on.
•
Check i
f
the right input mode is selected.
•
C
h
ec
k
w
h
et
h
er a
ll
t
h
e ca
bl
es to t
h
e unit are connecte
d
to t
h
e correct output jac
k
o
f
y
our device like BD/DVD recorder.
•
V
iew ot
h
er TV c
h
anne
l
s. T
h
e pro
bl
em mig
h
t
b
e
l
imite
d
to t
h
e
b
roa
d
casting station.
•
T
urn o
ff
the unit and wait
f
or about 1 minute, then turn on the unit again.
•
Check whether the connection o
f
the antenna
,
cable receiver or satellite box is
connecte
d
correct
ly
.
•
M
a
k
e sure t
h
at t
h
e se
l
ecte
d
input mo
d
e is connecte
d
to t
h
e wor
k
ing input jac
k
.
•
Check i
f
y
our computer is NOT in sleep mode when the input mode o
f
this unit is
in PC mo
d
e. Tap an
y
k
e
y
on t
h
e
k
e
yb
oar
d
to wa
k
e up
y
our computer
.
•
Make
su
r
e
that
the
sou
n
d
i
s
n
ot
m
uted.
Pr
ess
[
MUTE
]
so
that
the
v
olu
m
e
ba
r
an
d
current vo
l
ume
l
eve
l
wi
ll
a
pp
ear on t
h
e TV screen
.
•
M
ake sure that the volume is NOT set to “0” or “Mute”. I
f
so
,
use
[
VOL.
X
/
Y
]
to
a
d
just t
h
e
d
esire
d
vo
l
ume
.
No color
•
V
iew ot
h
er TV c
h
anne
l
s. T
h
e pro
bl
em mig
h
t
b
e
l
imite
d
to t
h
e
b
roa
d
casting station.
•
Ad
just “Co
l
or” in t
h
e main menu.
Adjusted ‘‘PICTURE” or ‘‘SOUND”
is not effective every time turn
on the unit.
• You must set ”Home” in ”Location”. Refer to page 33.
Otherwise, the settings you adjusted will not be memorized after you turn off the
unit.
Sound OK, picture poor
•
Electrical interference from nearb
y
appliances ma
y
affect picture qualit
y.
•
Ad
just “Contrast” an
d
“Brig
h
tness” in t
h
e main menu.
•
V
iew ot
h
er TV c
h
anne
l
s. T
h
e pro
bl
em mi
gh
t
b
e
l
imite
d
to t
h
e
b
roa
d
castin
g
station.
•
For the best picture qualit
y
, watch “high de
f
inition” wide screen programs.
If the HD content is not available, watch “standard definition” pro
g
rams instead.
Picture OK, sound poor
•
V
iew ot
h
er TV c
h
anne
l
s. T
h
e pro
bl
em mig
h
t
b
e
l
imite
d
to t
h
e
b
roa
d
casting station.
•
Check i
f
the audio cable is connected in correctly
.
You see a distorted picture or
hear an unusual sound.
• You ma
y
be getting interference from electrical appliances, automobiles,
motorc
y
cles or uorescent lights.
•
T
r
y
moving the unit to another location to see if this is the cause of the problem.
Ghosts, lines or streaks in
picture
•
Electrical inter
f
erence
f
rom nearb
y
appliances ma
y
a
ff
ect picture qualit
y.
•
V
iew other TV channels. The problem mi
g
ht be limited to the broadcastin
g
station.
You see “noise” or “trash” on the
screen.
•
W
hen the capabilities o
f
the unit exceed the capabilities o
f
the digital
broadcasting, the signal will be increased to match the capabilities o
f
the display
o
f
the unit. This may cause noise or trash.
Different color marks on the TV
screen
•
V
iew ot
h
er TV c
h
anne
l
s. T
h
e pro
bl
em mi
gh
t
b
e
l
imite
d
to t
h
e
b
roa
d
castin
g
station.
A9DF1UH_LD320SS1_EN_v1.indd 50A9DF1UH_LD320SS1_EN_v1.indd 50 2010/01/22 17:14:252010/01/22 17:14:25