


7
7
EN
INTRODUCTION PREPARATION
WATCHING TV
OPTIONAL SETTING OPERATING DVD DVD SETTING TROUBLESHOOTING
INFORMATION
EnglishEspañol Français
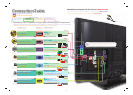
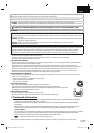
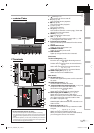
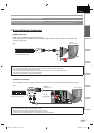
1.
yy
(
power
)
(
p. 15
)
Pr
ess
to
tu
rn
t
h
e
u
ni
t
o
n
a
n
d
o
ff
.
2.
B
(
pla
y
)
(
p. 36
)
Press to
b
egin t
h
e
d
isc p
l
a
yb
ac
k.
3.
C
(
sto
p)
(p
. 36
)
Press to stop the disc pla
y
back
.
4.
A
(
e
j
ect) (p. 36
)
Press to e
j
ect the disc
.
5.
C
H
K
/
L
(
p
. 16 /
p
. 17)
Press to select channels or move u
p
(
K
)
/ down
(
L
)
throu
g
h the main menu items
.
6.
S
ET
UP
(
p
. 15 /
p
. 44
)
Press to displa
y
the main menu
.
7.
V
O
L
X
/
Y
(
p
. 16
)
Press to ad
j
ust the volume or move right
(
X
)
/ left
(
Y
)
throu
g
h the main menu items.
8.
In
f
r
a
r
ed
se
n
so
r win
dow
Receives infrared ra
y
s transmitted from the remote
co
n
t
r
ol.
9.
P
O
WER
O
N in
d
i
cator
Li
gh
ts up
g
reen w
h
en power is on
.
10.
S
TAND BY in
d
i
cator
Li
g
hts up red when power is off
.
1
1
.
DVD in
d
i
cator
Li
g
hts up oran
g
e when the disc is inserted
.
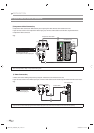
[
Si
d
e Pane
l]
1
2. Disc Loa
d
ing S
l
o
t
(
p. 36
)
Insert the disc with the label side
f
acing
f
orward
.
13. S-Video Input jack
(
k
p
. 12
)
S-Video cable connection
f
rom an external device.
14. Video Input jack
(
k
p
. 13
)
Video cable connection
f
rom an external device
.
15. Audio Input jack
(
k
p. 12 / p. 13
)
Audio cable connection
f
rom an external device
.
1
6. HDMI 2 Input jac
k
(
p
. 10 / p. 11
)
HDMI connection
f
rom HDMI device.
[
Rear Panel
]
1
7. AC power cor
d
(
p. 14
)
Connect the su
pp
lied AC
p
ower cord for a standard
A
C
outlet.
1
8. Ca
bl
e Mana
g
emen
t
(
p
. 14)
Use
th
i
s
holde
r
to
bu
n
dle
the
cables.
19.
Component Video and Audio Input jack
(
k
p
. 10 / p. 12)
Com
p
onent vi
d
eo ca
bl
e an
d
au
d
io ca
bl
e
co
nn
ect
i
o
n
f
r
o
m
a
n
e
x
te
rn
a
l
de
vi
ce.
20. Audio Output jack
(
k
p
. 13
)
A
ud
i
o
cab
l
e
co
nn
ect
i
o
n
fo
r
a
n
e
x
te
rn
a
l
de
vi
ce.
2
1. Audio Input
j
ack for HDMI
1
(
p
. 11 /
p
. 14)
A
ud
i
o
cab
l
e
co
nn
ect
i
o
n
f
r
o
m
a
DVI
de
vi
ce.
When
y
ou connect
y
our PC that has a DVI terminal
,
use a stereo mini p
l
ug conversion ca
bl
e as we
ll.
(For HDMI 1 Input jack onl
y)
22. Digital Audio Output jack
(
k
p
. 13
)
Coaxial digital cable connection
f
or a decoder or an
aud
i
o
r
ece
iv
e
r
.
23. Antenna Input jack
(
k
p. 10
)
RF
coaxial cable connection for your antenna or cable
TV signa
l.
24. HDMI 1 Input jack
(
k
p. 10 / p. 11 / p. 14
)
HDMI
co
nn
ect
i
o
n f
o
r HDMI
o
r DVI
de
vi
ce.
When
y
ou connect
y
our PC that has a DVI terminal,
y
ou can enjo
y
this unit as a PC monitor
.
T
e
rmin
a
l
s
Co
n
t
r
ol
P
a
n
el
8
9
11
10
75 16 4 3 2
N
ote:
*
service terminal (service use onl
y
)
• Use this terminal only when a so
f
tware update is necessary
.
• User should not connect an
y
devices to the service terminal such
as digital camera, ke
y
board, mouse, etc. (because these will not
w
ork
).
• The software update is, in most cases, handled b
y
an authorized
service person or in some circumstances the user ma
y
be aske
d
t
o do the software up
g
rade themselves.
24
20
21
22
12
23
18
17
15
13
14
16
*
19
A9DF1UH_LD320SS1_EN_v1.indd 7A9DF1UH_LD320SS1_EN_v1.indd 7 2010/01/22 17:12:012010/01/22 17:12:01