


-
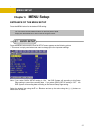
MENU SETUP
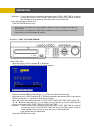
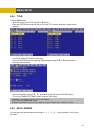
6.1.
oll of mouse to use the QUICK SETUP
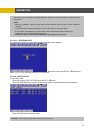
.1.2
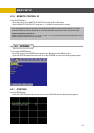
elect the desired IMAGE SIZE for recording using the (-), (+) buttons or wheel scroll of mouse.
6.1.3
ll of mouse.
** Please refer to chapter 6.3 RECORD.
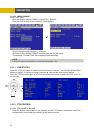
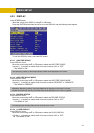
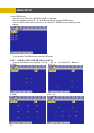
6.1.4 EVENT
Select a kind of EVENT using the (-), (+) buttons or wheel scroll of mouse.
If you want to select all kind of event, choose “ALL” and if you don’t want event recording, choose
“OFF”. The default is “ALL”.
Note: Except for schedule recording, to trigger event recording QUICK SETUP option must be set to
ON and the EVENT option must be setup.
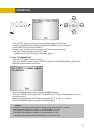
6.1.5 PRE RECORD TIME
Select the desired time for pre-recording using the (-), (+) buttons or wheel scroll of mouse. When
video loss, alarm or motion is detected, the DVR wi store pre-recorded data during the selected
6.1.6
co
ideo loss, alarm or motion is detected, the DVR will store post-recorded data during the selected
eriod. The post-recording time can be set from 0 second to 60 second and the default is “10”.
.1.7 IMAGE QUALITY
elect the desired image quality using the (-), (+) buttons or wheel scroll of mouse. There are 3
inds of image quality. Please refer to chapter 6.3 RECORD.
1 QUICK SETUP
Select “ON” or “OFF” using the (-), (+) buttons or wheel scr
setting.
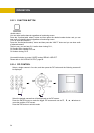
6 IMAGE SIZE
S
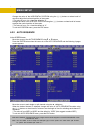
RECORD FRAME
Select the desired frame rate for normal recording using the (-), (+) buttons or wheel scro
All event channels will be recorded by the setting RECORD FRAME/16.
For example, if you set RECORD FRAME to 120, 16 each channel will be recorded by 7 ips.
ll
time. The pre-recording time can be set from 0 second to 5 second and the default is “5”.
POST RECORD TIME
Select the desired time for post-re rding using the (-), (+) buttons or wheel scroll of mouse. When
v
p
6
S
k
NOTE: The pre- and post- recording is not valid in normal recording mode.
arded. NOTE : If you select “ON”, RECORD MENU will be disreg
38