


EN-51
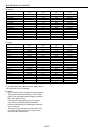
Troubleshooting (continued)
Others (continued)
Problem Solution
Images are not 3D.
※The 3D emitter and 3D
Glasses are sold separately.
They are not supplied with
this product.
• Are the image settings switched to 3D mode?
→
Switch the mode to 3D mode.
• Is there any block in the communication area between the 3D Emitter and the 3D Glasses? Or, is there a sticker or
other such item on the infra-red reception section on the 3D Glasses?
→
The 3D Glasses operate by receiving signals from the 3D Emitter. Check that there is not any block in the
communication area between the 3D Emitter and the 3D Glasses.
• Is the distance between the 3D Emitter and 3D Glasses too far, or too close?
→
Adjust the location of the 3D Emitter.
• Are the direction of the 3D Emitter and that of the infra-red reception section on the 3D Glasses misaligned?
→
Adjust the direction and location of the 3D Emitter.
• Is the 3D Glasses turned o?
→
Press the power button of the 3D Glasses to turn it on.
• It may need to switch the 3D mode (such as 3D setting system) of the recorder/player when projecting 3D images
with the 3D image supporting recorder/player. (For detail, see the User Manual of the recorder/player.)
• Is the 3D mode of the projector set properly for the image?
→
Set the 3D mode of the projector (frame packing, side-by-side, top and bottom) properly for the image.
• Is the 3D Emitter connected to the projector?
• The 3D Glasses may become out of sync due to uorescent light. Turn o the uorescent light.
• Is there any other 3D Emitter or 3D image supporting television close to the 3D Glasses?
→
The 3D Glasses work by receiving signals from the 3D Emitter. Check that there is no interference of the signals
from other infra-red emission section.
The power of the 3D Glasses
turns o automatically.
※The 3D Glasses are sold
separately. They are not
supplied with this product.
• Is there any block in the communication area between the 3D Emitter and the 3D Glasses? Or, is there a sticker or
other such item on the infra-red reception section on the 3D Glasses?
→
When the signal from the 3D Emitter is interrupted, the power of the 3D Glasses automatically turns o 5 minutes
after the interruption. Check that there is not any block in the communication area between the 3D Emitter and
the 3D Glasses.
There is something wrong
with the 3D images.
※The 3D Emitter and 3D
Glasses are sold separately.
They are not supplied with
this product.
• Depending on the 3D image status, you may feel something wrong with the 3D images.
→
Switch the “3D Sync” setting of the projector to check whether or not the uncomfortable feeling is disappeared.
→
When the signal from the 3D Emitter is interrupted, the power of the 3D Glasses automatically turns o 5 minutes
after the interruption. Check that there is not any block in the communication area between the 3D Emitter and
the 3D Glasses.
• The 3D Glasses may become out of sync due to uorescent light. Turn o the uorescent light.
• Is there any other 3D Emitter or 3D image supporting television close to the 3D Glasses?
→
The 3D Glasses work by receiving signals from the 3D Emitter. Check that there is no interference of the signals
from other infra-red emission section.
The indicator blinks ve times
when the power of the 3D
Glasses is turned on.
※The 3D Glasses are sold
separately. They are not
supplied with this product.
• The battery of the 3D Glasses dies.
→
Replace the battery with a new one.
The indicator does not light
up even if the power button is
pressed.
※The 3D Glasses are sold
separately. They are not
supplied with this product.
• Does the battery of the 3D Glasses die?
→
Replace the battery with a new one if the indicator does not light up even when you press the power button.
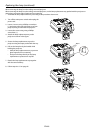
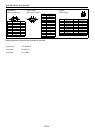
If the following problem occurs after the lamp is replaced, check the following rst.
Problem Solution
The projector does not
turn on.
• Attach the lamp cover securely. (See pages 44 and 45.)
• Reset the lamp operating time. (See page 45.)
The STATUS indicator
blinks.
• Reset the lamp operating time. (See page 45.)