


EN-7
Preparing your projector (continued)
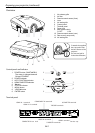
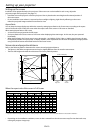
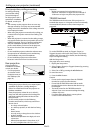
Overview
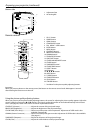
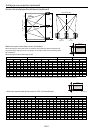
Terminal panel
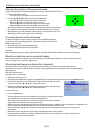
Control panel and Indicator
1 POWER button (ON/STANDBY)
The status is changed between
ON and STANDBY.
2 POWER indicator
3 AUTO POSITION/▲ button
4 HDMI/COMPUTER/◄ button
5 ▼button
6 STATUS indicator
7 MENU button
8 VIDEO/►button
9 ENTER button
1 Air exhaust grille
2 Air filter
3 Remote control sensor (front)
4 Lens
5 Air intake grille
6 Control panel
7 Terminal panel
8 Power jack
9 Main power switch
O: OFF I: ON
10 Remote control sensor (rear)
11 Rear cover (Lamp cover)
12 Air intake grille
1
2
3
4
7
5
8
9
10
11
12
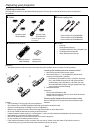
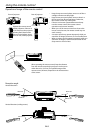
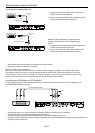
To attach the supplied
lens cap, push it into
the lens section of the
projector.
(For removal, pull it
in the other direction)
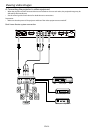
HDMI IN -1 terminal
HDMI IN -2 terminal
COMPUTER IN terminal
Service cap
SERIAL terminal
TRIGGER terminals
3D EMITTER terminal
1
2
3
4
5
6
7
8
9
COMPONENT IN terminals
VIDEO IN terminals
S-VIDEO IN terminals
6