


112 C2630M-B (4/08)
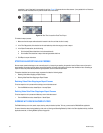
f. Do the following:
(1) In the PTZ Locking Auto-timeout drop-down box, select an appropriate timeout value. Timeout values can be set between five
and 60 seconds. The default value is 10 seconds.
Because the DX8100 Series DVR is designed to operate in a networked environment, it is possible that multiple users may
attempt to simultaneously control the PTZ features of a single camera. To minimize potential conflicts, only one user at a time is
allowed to control the PTZ features of a camera. PTZ control is made available on a first-come, first-served basis. Once a user
gains control of a camera’s PTZ features, all other users are locked out. All other users must wait until the controls for that
device have been left idle for the amount of time configured for that camera, as specified in the PTZ Locking Auto-timeout
drop-down box.
(2) To perform a PTZ test, click Pan-L (left), Pan-R (right), Tilt-U (up), and Tilt-D (down), to verify that the camera responds to PTZ
commands.
g. Set the selected camera address as follows:
(1) In the Dip Switch Address drop-down box, select an address from the available addresses. If the selected camera’s protocol is
set to NO PTZ or PELCO-C, the DIP Switch Address drop-down box is unavailable. In this case, the camera’s dip switch setting
cannot be set using software.
This option is available for cameras and protocols that support software-configured addresses. Only one address can be
assigned per camera. The DX8100 displays an error message if you attempt to assign the same address to different cameras.
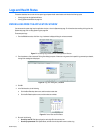
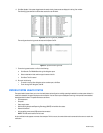
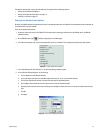
(2) To view the camera DIP switch address setting for all attached local cameras, click View. The DIP Switch Address View dialog
box opens. The assigned DIP switch setting for all attached cameras is displayed.
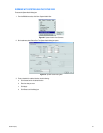
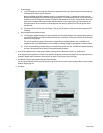
3. In the Picture Adjustment section, adjust picture properties by moving sliders for Brightness, Contrast, Hue, and Saturation.
As you adjust the picture properties of a camera on the local DVR, changes will be reflected immediately in the view area near the top of
the screen. Changes made to cameras at a remote site will not appear in the view area until you click Apply.
4. Click Default to return all picture property settings to the normal state.
You can click the Hide/Show button to clear the view area to get a better look at your picture property changes. Refer to step 2 in Motion
Detection Setup on page 113.
5. Click Apply.
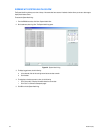
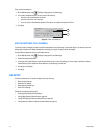
Figure 86. Camera Page