


188 C2630M-B (4/08)
DELETING AN EXISTING BACKUP SCHEDULE
To delete an existing schedule:
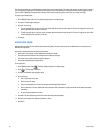
1. On the DX8100 toolbar, click . The DX8100 setup screen is displayed.
2. Click . The backup configuration screen is displayed.
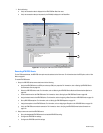
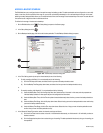
3. In the “Backup schedule” table, click the backup schedule you want to delete.
4. Click Delete.
5. Click Apply.
INITIATING AN INSTANT BACKUP SCHEDULE
The DX8100 allows you to schedule an instant backup; time setting options are displayed when you select instant backup. In this case, you are
given quick access to select the backup device, day and time, channel record type, and recording category. Once you establish the backup
schedule, you can view the estimated backup size before starting the actual backup process.
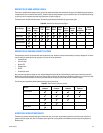
The DX8100 provides initial default settings. You can save time by accepting the following defaults:
• Backup time range: The current day and time you initiated the instant backup routine.
• Channel record type: All channels.
• Categories: All Recording.
To perform an instant backup:
1. On the DX8100 toolbar, click . The DX8100 setup screen is displayed.
2. Click . The backup configuration screen is displayed.
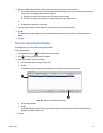
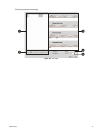
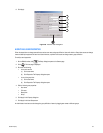
3. In the Backup page, do the following:
a. Click Instant Backup. The Backup Now dialog box opens.
b. Click the selection check box for the device you want to receive the instant backup data.
4. Do one of the following:
a. To accept backup schedule options:
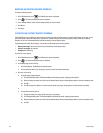
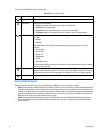
(1) Click Estimated Backup Size. The Estimated Backup Size dialog box opens, displaying backup details.
(2) Read the backup information and verify that the selected backup device provides adequate space to receive the backed up data.
(3) Click OK.
(4) Click OK to accept the defaults for the time setting, channel record type, and categories. The backup starts immediately.
or
b. To customize the backup options:
(1) Change the backup time range, channel record type, and category.
(2) Click Estimated Backup Size. The Estimated Backup Size dialog box opens, displaying backup details.
(3) Read the backup information and verify that the selected backup device provides adequate space to receive the backed up data.
(4) Click OK.