


C2630M-B (4/08) 19
LOGGING OUT OF A REMOTE SITE
Logging out of the local or a remote DVR does not disconnect you from that system. Logging out will return you to the Guest account.
To disconnect from a remote server, refer to Disconnecting from a Remote Site on page 18. You can only log out of one server at a time. If you are
logged into multiple servers, you must log out of each server individually. You can also log out of a local or remote DVR by right-clicking its site
name from the Site tree and selecting User Log-out from the quick-menu.
To log out of a local or remote DVR site:
• From the DX8100 menu bar, choose File > User Log-out.
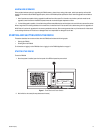
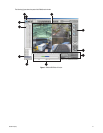
WORKING WITH DUAL MONITORS
DX8100 version 1.2 includes a standard Dual Display Card that provides additional viewing of up to 72 video channels simultaneously, in either of
two ways:
• VGA output: This feature allows you to display video from selected cameras on the extended monitor, while at the same time displaying
video from selected cameras on the primary monitor. The primary monitor remains available for other tasks, such as viewing and controlling
PTZ cameras and monitoring video from cameras displayed on the extended monitor. Up to 36 cameras can be displayed on each monitor.
Video from any connected server can be displayed on the monitors.
• Composite output: The Dual Display Card provides a composite video BNC output the allows video to be displayed on a monitor up to
1500 feet away from the server.
If you upgraded your unit from version 1.1 to 1.2, the Dual Display Card is supported. After the display card is installed, refer to Configuring the
Dual Display Card. For information about installing the card, refer to the DX8100 Dual Display Card Installation manual (C2637M).
CONFIGURING THE DUAL DISPLAY CARD
To configure the DX8100 to display video on the extended monitor:
NOTE: When you enable the extended monitor when using the Dual Display Card, the DX8100 needs to be restarted to enable the overlay
feature on both monitors.
1. From the DX8100 menu bar, choose File > Exit. The “Shut down” dialog box opens.
2. Click “Exit to Windows.”
3. Click OK.
The “Log On to Windows” dialog box opens.
4. Enter the Windows password and then click OK. The system logs you into the operating system.
5. Go to Start > Settings > Control Panel, and then double-click the Display icon. The Display Properties dialog box opens.
6. Click the Settings tab.
7. To enable the extended monitor, do the following:
a. On the Settings tab, click the monitor icon that represents the extended monitor you want to use in addition to your primary monitor.
b. Click “Extend my Windows desktop onto this monitor.”
c. In the “Color quality” area, select Highest (32 bit).
NOTE: If the color mode is set to Medium (16 bit), video will not be displayed on the extended monitor.
d. In the Screen resolution area, set the resolution to match the resolution set for the primary monitor.
e. By default, the extended monitor’s icon is located to the right of the primary monitor’s icon. Do nothing to accept the default location
or left-click and drag the icon to the desired location.
8. Click OK.
9. Restart the DX8100. The Pelco slash screen is displayed on the extended monitor.
For information about mapping channels for display on the extended monitor, refer to Mapping Channels on the Extended Monitor on page 32.