


C2630M-B (4/08) 187
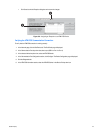
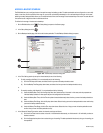
6. (Optional) In the Device Selection section, map a network drive for backup by performing one of the following:
a. Click the “Map a network drive” button. The Windows Map Network Drive dialog box opens. For more information about mapping a
network drive, refer to Mapping a Network Device on page 189.
(1) Specify the drive letter for the connection and to which folder you want to connect.
(2) Click Finish. The mapped drive is displayed in the Device Selection area under “Remote drives.”
or
b. Click Disconnect a mapped drive” to disconnect.
7. In the Device Selection section, click the check box for the device to which you want the data backed up.
8. Click OK.
The “Backup schedule” table is displayed, the newly scheduled backup time range is listed in the table, and the selection check box is
marked.
9. Click Apply.
EDITING AN EXISTING BACKUP SCHEDULE
The DX8100 allows you to edit or delete an existing backup schedule.
To edit a backup schedule:
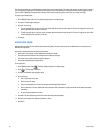
1. On the DX8100 toolbar, click . The DX8100 setup screen is displayed.
2. Click . The backup configuration screen is displayed.
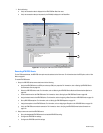
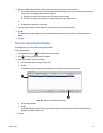
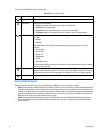
3. In the “Backup schedule” table, do the following:
a. Click the backup schedule time range you want to edit.
b. Click Edit.
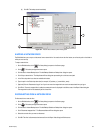
The Edit Backup Schedule dialog box opens, displaying the current settings for the selected backup schedule.
Figure 160. Editing an Existing Backup Schedule
c. Edit the backup parameters.
d. Click OK.
The Edit Backup Schedule dialog box closes, and the backup configuration screen is displayed. The updated schedule details are
displayed in the “Backup schedule” table.
4. Click Apply.
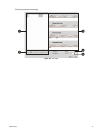
ᕡ
ᕢ