


124 C2630M-B (4/08)
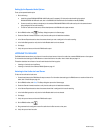
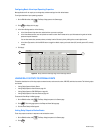
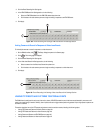
3. Click the Event-Recording Link Settings tab.
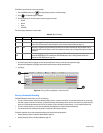
4. In the ATM/POS Record Link Settings section, do the following:
a. Select an ATM/POS address from the ATM/POS address drop-down box.
b. Click the button for each camera you want to begin recording in response to an ATM/POS event.
5. Click Apply.
Figure 102. Event-Recording Link Settings: ATM/POS Record Link Settings Section
Linking Cameras to Record in Response to Video Loss Events
To link multiple cameras to record in response to a video loss event:
1. On the DX8100 toolbar, click . The Setup dialog box opens to the Camera page.
2. Click . The Linking page is displayed.
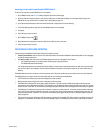
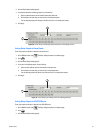
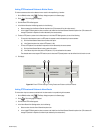
3. Click the Event-Recording Link Settings tab.
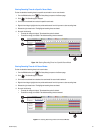
4. In the Video-Loss Record Link Settings section, do the following:
a. Select a camera from the Video-Loss Channel drop-down box.
b. Click the button for each camera you want to begin recording in response to a video loss event.
5. Click Apply.
Figure 103. Event-Recording Link Settings: Video-Loss Record Link Settings Section
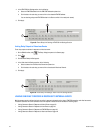
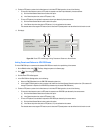
LINKING PTZ PRESETS AND PATTERNS TO EXTERNAL EVENTS
The DX8100 can be configured in such a way that motion, alarms, ATM/POS transactions, and video loss events detected by one camera will
result in the repositioning of another. Similarly, alarm inputs can be set to trigger camera-positioning presets. Only a single preset or pattern can
be linked to a camera.
This section describes how to link PTZ presets and patterns to motion and alarm events, including the following topics:
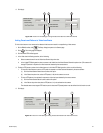
• Linking PTZ Presets and Patterns to Motion Events on page 125
• Linking PTZ Presets and Patterns to Alarm Events on page 125
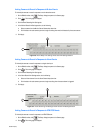
• Linking Presets and Patterns to ATM/POS Events on page 126
• Linking Presets and Patterns to Video Loss Events on page 127
4
b
4a
4a
4
b
4a